Tech Ideas & Best Practices
What’s one lifehack that was shared by three influential leaders: Barack Obama, Steve Jobs, and Mark Zuckerberg?
All three of them are known for wearing almost the same outfit every day, inadvertently creating their own personal brand.
Why?
One of them said, "To reduce decision fatigue and free up mental energy for more important tasks."
What is decision fatigue?
It refers to a state of mental exhaustion that occurs after making too many decisions, especially when those decisions are complex or significant.
In the digital realm, users encounter countless decisions daily, such as which buttons to click, which boxes to check, and which forms to fill out that leads to cognitive overload. As designers, how can we simplify the users' experience and make their decision-making process a no-brainer?
Let's discuss a few tips based on real-life scenarios.
If the famous poet Robert Frost were to summarize this blog in his words, he might say something along the lines of:
“Two roads diverged in a yellow wood, and
the user took the one more traveled by,
And that has avoided all the confusion!”
If you had to wear the same outfit every day, which one would you choose?
Happy Decision Making!

The Science Behind the Click: The Psychology of Decision-Making!
All three of them are known for wearing almost the same outfit every day, inadvertently creating their own personal brand.

Imagine driving on a road full of potholes, that’s how your employees feel when using your intranet which has too many UX issues. Here’s a list of common UX pitfalls that make employees frustrated or even hate using your company’s Intranet.
1. Slow Load Times
Waiting equals frustration. If pages take more than a few seconds, users give up or get distracted.
How to fix?
Focus on optimizing the network infrastructure, server performance, and content delivery. Consider content management practices like archiving old content, optimizing images and videos, and using caching mechanisms.
2. Confusing Navigation
If users can’t find what they need quickly, they’ll either click around endlessly or just ask someone else.
How to fix?
Use a clear menu, group related tasks, and include a sitemap.
3. Too Many Clicks
Making users go through 5+ clicks to find the relevant information or to complete a simple task is NOT acceptable.
How to fix?
Streamline user flows; use personalized quick links /shortcuts for frequent tasks.
4. No Mobile Optimization
If it doesn’t work well on phones or tablets, remote or field employees are stuck.
How to fix?
Make sure the design is responsive by testing on different sized devices

10 UX Pitfalls that make your employees hate your Intranet!
Imagine driving on a road full of potholes, that’s how your employees feel when using your intranet which has too many UX issues.
Remember the game “Passing the Message”? One person whispers a message to another, and by the time it reaches the last player, the sentence has completely changed. It’s fun, but it also teaches a valuable lesson about communication and it's eerily similar to what happens in many organizations today.
Without a centralized, user-friendly platform, internal communication often gets lost in translation. An intranet helps by bringing all company information together in one place. However, the success of an intranet depends not just on its features but also on the user experience (UX).
Like in the game, a poor UX can lead to confusion, disengagement, and misinformation. Conversely, A great UX ensures that the message is communicated clearly, consistently, and enthusiastically across the organization.
So, how does UX truly impact intranet adoption? Let’s explore.
How Can a Better User Experience Engage Users?
To create an intranet that employees enjoy using, we need to think beyond just logic. A good user experience should connect with users emotionally. Just as we connect with our favorite apps or websites, the intranet should feel familiar, easy to use, and enjoyable. It should align with the way people think, feel, and work every day. Let’s break it down using the human senses as a guide:
Eyes – Grabbing Attention
First impressions matter. Just as our eyes help us notice things quickly, the visual design of the intranet plays a major role in capturing attention. When the design provides a visually pleasant experience and incorporates your company’s colors, fonts, and images, it feels familiar. Employees feel a connection, thinking, 'This is ours’.
Examples:
- Shaping the intranet design to echo your company's brand values.
- A simple, clear design helps users focus on what’s important.
- Rotating banners or hero images that reflect current campaigns or internal events.

Mind – Aligning with Intuition
Once the eyes notice something, the mind starts to think and judge. It compares what it sees with existing knowledge. That’s why the intranet should be easy to understand and navigate. A straight forward layout, intuitive menus, and neatly organized content make users feel at ease. When people don’t have to guess where to find information, they’re more likely to return and use it again.
Examples:
- Grouping content logically: HR policies, quick links, department pages.
- Intelligent search that understands shortcuts and key terms.
- Easy-to-access menus that remember the user’s last location.


Curiosity – Inviting Exploration
Once the design grabs the eye and aligns with the mind, users become curious, encouraging them to explore more. If the intranet includes well-designed and interactive tools, it captures their interest. As a result, occasional visitors may start using it more actively.
Examples:
- Interactive web parts like calendars, polls, and task reminders.
- Custom dashboards with relevant information based on role or department.
- News feeds and boards that celebrate employee achievements, birthdays, and new joiners.


How Good UX Drives Intranet Adoption?
To create an intranet that employees enjoy using, we need to think beyond just logic. A good user experience should connect with users emotionally.

In today’s fast-paced work environment, keeping everyone updated with the latest news and announcements is crucial. With Power Automate, you can streamline the process of creating news posts in SharePoint directly from Outlook emails. This automation saves time and ensures that important information is shared quickly and efficiently. This blog walks you through the steps to set up this efficient integration.
What You’ll Need
- Power Automate: Included with most Microsoft 365 plans for creating automated workflows.
- SharePoint Site: The destination site where your news articles will be published.
- Outlook Account: A Microsoft 365 Outlook account to receive emails.
Step-by-Step Guide to Create Your Flow
Step 1: Set Up the Trigger
Begin by signing in to Power Automate and creating a new flow using the "When a new email arrives" trigger from Outlook. You can set specific conditions to filter the emails that will initiate the flow, such as emails with a particular subject line (e.g., "News Update")

Step 2: Extract Content and Attachments
After setting the trigger,
Outlook Attachments:
- Add a "Get Attachment (V2)" action to set the "Message Id" and “Attachment Id” in the action.
- Use an "Apply to each" action to iterate through the attachments.
- Add a "Create file" action to store the Outlook attachment(image.png) in SharePoint, specifying the Site Address, Folder Path, File Name, and File Content. Then, use a "Get files (properties only)" action to retrieve the properties of the uploaded image for use in the news post.


From Inbox to Intranet: Automate SharePoint News Posts in Real-Time
In today’s fast-paced work environment, keeping everyone updated with the latest news and announcements is crucial.

Introduction
SharePoint introduced flexible layout section, within the flexible section we can move the webpart anywhere on the two-dimensional grid, resizing, over lapping and grouping the webparts, this guide covers how to use flexible sections in SharePoint, from adding web parts to customizing layouts for mobile views.
How to add flexible section in SharePoint Page
Just like adding other sections, click the Section button. This will open the Section toolbox. In the toolbox, you will see the Flexible Section listed first. Click on Flexible to add a Flexible Section to your page.

How to add web parts in flexible sections?
- After adding a Flexible Section to your page, web parts cannot be added directly. Instead, you need to drag them from one of the Column Layouts into the Flexible Section, duplicate an existing web part, or use the Toolbox pane. The Toolbox pane, located on the right side, allows you to easily add web parts by clicking or using the drag-and-drop feature into the Flexible Section.

- The Flexible Section contains a 12-cell,two-dimensional grid. We can move web parts anywhere within this grid. When dragging and dropping a web part, grid lines will appear to help with alignment. The web part's top-left corner will automatically align with the nearest border.

How to Resize Web Parts
- We can easily resize web parts using the resize handles, which are located at the center of the left and right borders of the web part. Simply drag the handles to increase or decrease the size of the web part within the Flexible Section. Additionally, web parts can be overlapped within Flexible Sections for a more customized layout.


- Web part resizing options vary depending on the type of web part. Web parts such as Text and Image can be resized to any widths. Other web parts, like Quick Links and People, have a default minimum width of four grid columns and a maximum width of eight grid columns. Similarly, custom web parts added within the Flexible Section follow the same default resizing limits, with a minimum width of four grid columns and a maximum of eight. Resize hints will appear while adjusting the web part size.


How to Resize Flexible Sections
To adjust the height of the Flexible Section, Click on the section to see the section resize handles located at the bottom. If you need more space to add web parts within the Flexible Section, simply drag the resize handles to adjust the section's height as needed.

How to Arrange and Group Web Parts
- If web parts overlap within the Flexible Section, we can easily arrange them. In the web part toolbar, click on the Arrange Item icon from the dropdown to reposition the web parts, adjusting which one appears in front and which one appears in the back.

- We can also group web parts within the Flexible Section. To do this, click on the first web part you want to group, then hold down the Ctrl key (Windows) or Option key (Mac) and select the other web parts you want to include. Once all the desired web parts are selected, click on the Arrange Items icon, then choose Group from the dropdown to group them together. Now, you can move the entire group by dragging it anywhere within the Flexible Section.

- To ungroup a web part, select Ungroup from the dropdown to separate the web parts.


How to Use Flexible Sections in SharePoint Pages: A Simple Guide
SharePoint introduced flexible layout section, within the flexible section we can move the webpart anywhere on the two-dimensional grid,

In your Microsoft 365Tenant, there may be a lot of workflows running numerous times every day some execute automatically, some follow a schedule, and others trigger instantly upon user requests. Additionally, Desktop Flows are used to integrate with legacy systems. As a result, multiple workflows operate simultaneously to meet various requirements.
With many workflows running, several challenges arise:
- Monitoring each flow is time-consuming.
- Validating execution times can be complex.
- Flow owners receive summary notifications for failed workflows but must manually check each one to diagnose issues.
To overcome these challenges, Microsoft introduced the Automation Center.
What is a Power Platform Automation Center?
The Automation Center in Power Platform is a central hub for tracking and managing automation in Power Automate. It helps different users, like creators, operators, CoE team members, and business analysts, to oversee and improve their automation processes. With a clear, all-in-one view of automation data, it makes it easier to gain insights and improve the efficiency of their automation workflows.
Key Features of the Automation Center
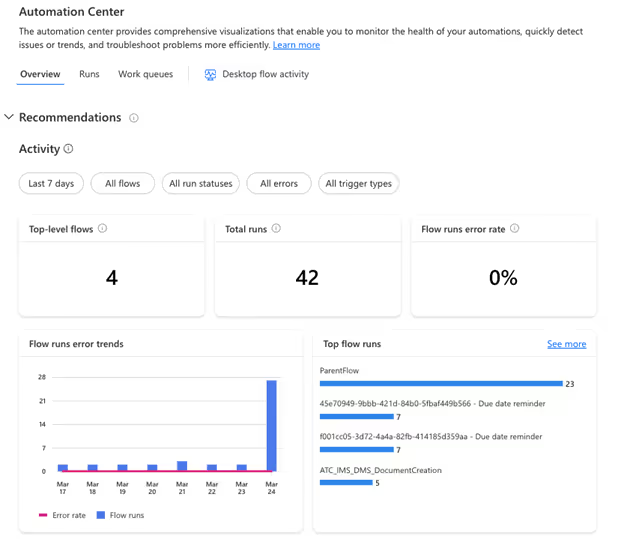
- Overview Tab: The Overview tab in the Automation Center gives you a clear, high-level view of their automation performance. It tracks all related cloud and desktop flow runs, allowing you to monitor the entire process from start to finish. With insights on total runs, success rates, and key performance metrics, you can quickly identify trends, ensure smooth operations, and optimize workflows for better efficiency.
- Runs and Process Map Pages: These pages provide clear visuals and data on your cloud and desktop automation runs, helping you quickly see if your workflows are successful or need attention. With detailed insights into each step, business users can make informed decisions to improve efficiency and ensure smooth operations.

- Recommendations: The Automation Center provides proactive and reactive suggestions to enhance the reliability, efficiency, and general health of your automation. These recommendations follow the best practices and offer actionable insights to improve your workflow.
- Integrated Copilot: The Automation Center includes an integrated copilot that assists you in navigating the platform and optimizing their automation processes. The copilot provides guidance and support, making it easier for you to manage their workflows effectively.

- User-Friendly Interface: With its intuitive dashboard and user-friendly interface, the Automation Center enables users to access and analyze automation-related data effortlessly. The platform's design ensures that users can quickly find the information they need and take appropriate actions to optimize their workflows.

Boosting Your Business with the Automation Center in Power Platform
In your Microsoft 365 Tenant, there may be a lot of workflows running numerous times every day some execute automatically,

So, the success party for the launch of your new intranet is over, and now you face the important task of ensuring it remains current and engaging. Maintaining your SharePoint intranet is crucial for effective communications, team productivity, and ensuring the system stays fresh and functional.
It is important to establish a strategy for regularly updating the content and providing a steady flow of new information. So, here's a checklist to keep your Intranet buzzing, and make your team coming back for more!
Weekly checklist
These brief, quick check-ins conducted on a weekly basis may enhance relevance and activity within your intranet:
- Check for Latest news / announcements. Ensure they are updated at the source from where your intranet fetches the content, e.g. like social media sites, intranet pages etc.
- Gather feedback from users and respond to user feedback or comments.
- Ensure the Events calendar is up to date and all the important events / holidays are updated.
- Ensure Any reminders / alerts which are past the due date, are removed.
Monthly checklist
These monthly tasks aim at maintaining the security, organization, and usability of your SharePoint site:
- Ensure the new joiners are updated in the HR repository and their joining date, birthdays are updated. This will ensure their date get automatically pulled on the new joiners / birthdays & anniversaries webpart if you have included them on your intranet homepage.
- Ensure the Monthly calendar is up to date and all the important events / holidays are updated.
- Archive documents and pages that are stale or rarely used.
- Ensure that all department pages and respective department contacts are updated with recent data.
- Ensure all the admin / auto-response emails are active and the inbox is not full.
- Verify appropriate functioning of forms, workflows, and other automations.
- Fix all broken internal links and ensure there is no loose hanging content in any of the subpages.
- Modify user permissions to include new users and remove stale users as needed.
- Monitor total storage space and clean up unnecessary redundant content.
Quarterly checklist
Feel free to do these every now and then to ensure content remains engaging and everything runs smooth:
- Ensure the department wise contacts are up to date.
- Ensure the townhall calendars are up to date, if any.
- Revise branding as well as promotional materials, banners, and visuals set on the homepage.
- Gather comments from department leads on what improvements can be made.
- Enhance the intranet’s performance to evaluate the speed and ease of navigation.
With these simple checklists, your SharePoint intranet will stay reliable, clean, and helpful. Set reminders for these tasks and keep improving your digital workspace and we guarantee your users will keep coming back for more!

How to keep your SharePoint Intranet updated: Weekly, Monthly & Quarterly Checklists.
So, the success party for the launch of your new intranet is over, and now you face the important task of ensuring it remains current and engaging.
Typography is constantly evolving, with new trends emerging that shape how brands communicate visually. In 2025, several typography styles are defining modern UI/UX design:
1.Monospace Fonts
Monospace fonts continue to rise in popularity, especially in UI design for coding interfaces, tech branding, and minimalist aesthetics. They bring a structured and technical look to digital experiences.

2. Retro Revival Fonts
Vintage-inspired typefaces from the 1970s, 1980s, and 1990s are resurging in popularity, bringing a sense of nostalgia and personality to modern designs. These fonts feature bold, expressive styles and playful textures that bring a sense of familiarity and warmth, while enhancing authenticity and character in designs.

3. Minimalist Sans Serif Fonts
Characterized by clean, simple lines and lack of decorative elements, minimalist sans serifs convey modernity and sophistication. They remain a top choice for contemporary brands looking for a sleek and timeless feel.

4.Handwritten & Organic Fonts
Mimicking natural handwriting, these fonts add a personal touch to digital experiences, making brands feel more authentic, creative, and approachable. They are widely used in branding that aims to foster a closer connection with users.

5. Sci-Fi & Futuristic Fonts
Sci-fi and futuristic fonts are becoming increasingly popular with the rise of AI, Web3,and tech-driven branding. These typefaces typically showcase sharp angles, geometric shapes, and a digital look, making them perfect for brands aiming to express innovation and a futuristic edge. These fonts are used in AI-driven applications, fintech platforms, and gaming interfaces, creating a sleek and modern appeal.


Typography Trends for 2025
Typography is constantly evolving, with new trends emerging that shape how brands communicate visually.
Migrating OneNote pages to SharePoint as documents can be a tedious task when done manually. In this blog, I will explain a step-by-step process to automate the migration using Power Automate.
Note: Images inside OneNote pages cannot be migrated using this method. A different approach and some manual works are required for that.
Step-by-Step Automated Migration Flow
1. Trigger: Manual Trigger
I have used a manual trigger for this flow, but you can modify it as per your needs. Additionally, I have initialized two variables to store the notebook key and section key.

2. Get OneNote Notebooks
I used the "Get recent notebooks" action to fetch the available notebooks and added a condition to select only one notebook, storing its key in a variable. If needed, you can loop through all the notebooks instead.


Automating OneNote to SharePoint Migration Using Power Automate’s OneNote Actions
Migrating OneNote pages to SharePoint as documents can be a tedious task when done manually.

SharePoint Online continues to evolve, bringing new features and enhancements to improve user experience and streamline administrative tasks. In this blog, we'll cover three major updates: the introduction of the Table Toolbar, changes to the API Access page in the SharePoint Admin Center, and improvements to the SharePoint eSignature service.
1. Table Toolbar: Enhanced Table Management
The new Table Toolbar in SharePoint Online is designed to offer users an intuitive and efficient table management experience. Previously, table styling options were available within the text web part, but now, with the dedicated Table Toolbar, users gain access to a comprehensive set of table-related functionalities.
Key Features of the Table Toolbar:
- Expanded Table Styles: Enjoy all the familiar Table Styles along with additional formatting options.
- Merge and Split Cells: Seamlessly merge or split table cells for customized layouts.
- Add Space Before and After: Improve table readability by adding space before and after your tables.
- Always Accessible Menu: The toolbar remains in focus while working on a table, eliminating the need for constant context switching.
- Responsive Design: The toolbar adapts to your section layout. When using narrower layouts, table options conveniently move into the overflow (...) menu.
This streamlined approach ensures that content creators have quick access to table management tools, enhancing productivity and content presentation.
2. API Access Page Updates in the SharePoint Admin Center
Microsoft is introducing changes to the API Access page within the SharePoint Admin Center. These adjustments aim to ensure that SharePoint Online remains secure and functional.
What’s Changing?
- Pre-Authorized Permissions: A set of additional permissions will be automatically pre-authorized by Microsoft.
- Seamless Functionality: These permissions are essential for the core functionality of SharePoint Online.
- Improved Visibility: Admins will have better insights into the permissions required for SharePoint Online to operate effectively.
Rollout Timeline:
- Targeted Release: Starting mid-March 2025, completing by mid-March 2025.
- General Availability: Rolling out worldwide by late March 2025.
Read more: How to grant API permissions in SharePoint admin?

Latest Updates on SharePoint Online: Table Toolbar, API Access Changes, and eSignature Enhancements
SharePoint Online continues to evolve, bringing new features and enhancements to improve user experience and streamline administrative tasks.

Effective governance in SharePoint ensures data security, compliance, and optimal collaboration. This extended guide details key governance tools, policies, and practical examples in SharePoint, referencing official Microsoft guidelines.
1. Information Architecture
Information architecture organizes, labels, and structures content to ensure efficient discovery and usability. A strong information architecture improves productivity by enabling users to quickly locate and utilize necessary data.
- Sites and Hubs: SharePoint structures content through site collections and hub sites. Hub sites connect related sites, ensuring consistent navigation and themes. For instance, an organization might establish a hub site for Human Resources, linking to subsites such as Recruitment, Policies, and Employee Benefits.
- Navigation and Search: Implement clear navigation paths and configure search to improve content discoverability. For example, create intuitive navigation bars, breadcrumb trails, and use refiners in search results to help users narrow down content quickly.
- Metadata and Content Types: Use managed metadata and content types to classify and standardize data organization. For instance, a document library for project documents might use content types such as "Project Plan," "Risk Assessment," or "Budget Reports," each with specific metadata fields like project phase, due dates, or project managers.
2. Permissions and Access Control
Permissions manage user access to SharePoint content, preventing unauthorized access and ensuring content integrity.
- Default Groups and Roles: SharePoint provides default permission levels (Owners, Members, Visitors). For example, HR site owners manage permissions, HR team members contribute content, and other employees might only have viewing permissions.
- Least Privilege Principle: Assign users only the permissions necessary to complete their tasks. For example, provide read-only access to employees for compliance documentation, reserving editing rights for compliance managers only.
- Regular Reviews and Auditing: Perform routine audits of permissions to ensure that former employees or role changes do not result in improper access. Regular permission checks could reveal that a contractor who left three months ago still has access, prompting immediate removal.

Governance of Data in SharePoint: Tools, Policies, and Best Practices
Effective governance in SharePoint ensures data security, compliance, and optimal collaboration. This extended guide details key governance tools, policies, and practical examples in SharePoint,

This beginner-friendly guide will introduce you to PowerApps and guide you through building a simple app. You'll learn how to choose different layouts, enable coauthoring, and use modern controls. It also covers adding data sources, designing, testing, and publishing your app, ultimately inspiring you to explore advanced features and integrations.
What is PowerApps?
PowerApps is a Microsoft tool that comes under Microsoft 365 services. This allows you to create custom apps without coding. It helps businesses automate tasks, connect with various data sources like SharePoint, SQL, Excel, and Dynamics 365, and create user-friendly apps with drag-and-drop functionality.
Step-by-Step Guide to Create a Simple PowerApps App
Step 1: Sign in to PowerApps
- Go to PowerApps website
- (https://powerapps.microsoft.com), sign in with your Microsoft account. Enter your Email ID and Password.

- Click on Create and choose Start with a blank canvas.

- Choose any one of the three layouts based on your requirements.

- Responsive Layout – Automatically adjusts to different screen sizes for a better user experience across devices.
- Tablet Layout – Best for larger screens like iPads, tablets, and desktops.
- Phone Layout – Optimized for mobile devices with a vertical scrolling design.
Which one should you choose?
- If your app will be used mostly on desktops or tablets, select Tablet Layout.
- If it’s mainly for mobile users, select Phone Layout.
- If you need a flexible design that adjusts to different screens, select Responsive Layout.
Next Step:
- Choose the layout based on your needs.
- Click Create to start designing your PowerApps application.
- Enter your App name.
Step 2: Enable Coauthoring in Power Apps
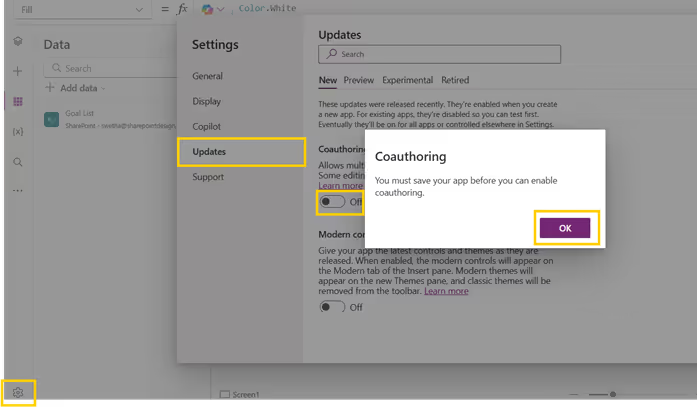
Coauthoring allows multiple users to work on an app simultaneously. To enable this feature:
- Go to Power Apps Studio and open the app.
- Click the Settings icon.
- Click the Updates menu from thesidebar
- Under the New tab, turn on the Coauthoringtoggle.
- Click OK to update the settings.
- Publish the app. After that changes can be visible if some updates the app.
Step 3. Enable Modern Controls in Power Apps
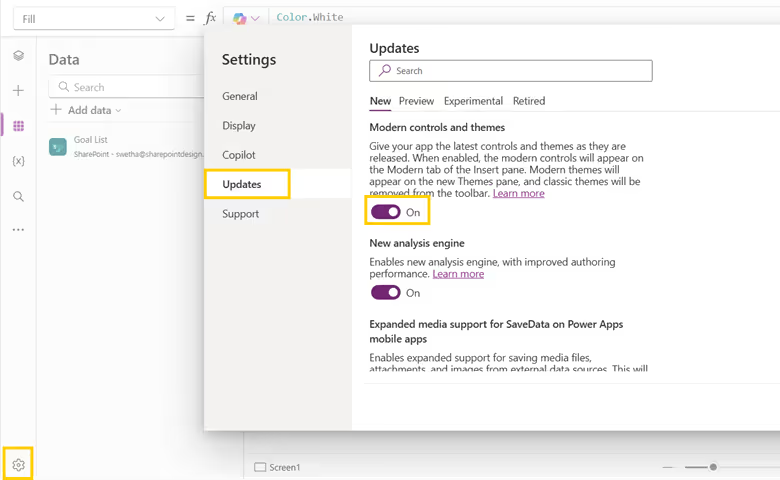
Modern controls improve the app's UI and usability. To enable them:
- Go to Power Apps Studio and open your app.
- Click the Settings icon.
- Click the Updates menu from the sidebar.
- Under the New tab, turn on the Modern controls and theme toggle.
- Save and refresh the app to access new modern controls (e.g., modern buttons, text inputs, and combo boxes).
Step 4: Add a Data Source
For this example, we will use a SharePoint site stored in the list.
- Click Data (on the left panel)> Add Data > Select SharePoint.

- Choose your SharePoint site and select the correct list to connect.
Step 5: Design Your App
- Add a Text Input, labels, Date Picker and Button to allow users to add new records.

- Set the button’s OnSelect property:
- Click Insert > Gallery> Vertical to display data.
- Set the gallery’s data source to your SharePoint list.

Step 6: Test and Publish
- Click the Play button to test your app.
- If everything works fine, click Save and Publish.
Conclusion
This is just the beginning—PowerApps allows you to create more advanced apps with automation, complex logic, and integrations. PowerApps can integrate with Power Automate for automation, Power BI for reporting, and much more. Keep exploring and creating amazing apps!
How SharePoint Designs Can Help
At SharePoint Designs, we specialize in delivering expert PowerApps consulting services tailored to your business needs. As a trusted PowerApps consultant, we help organizations of all sizes design, develop, and optimize custom applications that improve efficiency and reduce manual effort.
Customized PowerApps Consulting
We work closely with your stakeholders to understand business processes, identify automation opportunities, and build tailored apps that solve real operational challenges. From initial strategy and planning to design, development, and support, our end-to-end consulting ensures a seamless experience.
Integration with SharePoint, Teams, and Microsoft Ecosystem
Our PowerApps consultants specialize in creating intelligent apps that connect seamlessly with Microsoft 365 tools, including SharePoint, Teams, Outlook, and Power Automate. These integrations streamline workflows, centralize data access, and enable efficient collaboration across your organization.
Whether you're building your first app or scaling Power Platform adoption enterprise-wide, SharePoint Designs is your go-to partner for strategic PowerApps consulting that drives measurable business outcomes.

PowerApps for Beginners: A Guide to Building Your First App
This beginner-friendly guide will introduce you to PowerApps and guide you through building a simple app.



.svg)