Tech Ideas & Best Practices
In your Microsoft 365Tenant, there may be a lot of workflows running numerous times every day some execute automatically, some follow a schedule, and others trigger instantly upon user requests. Additionally, Desktop Flows are used to integrate with legacy systems. As a result, multiple workflows operate simultaneously to meet various requirements.
With many workflows running, several challenges arise:
- Monitoring each flow is time-consuming.
- Validating execution times can be complex.
- Flow owners receive summary notifications for failed workflows but must manually check each one to diagnose issues.
To overcome these challenges, Microsoft introduced the Automation Center.
What is a Power Platform Automation Center?
The Automation Center in Power Platform is a central hub for tracking and managing automation in Power Automate. It helps different users, like creators, operators, CoE team members, and business analysts, to oversee and improve their automation processes. With a clear, all-in-one view of automation data, it makes it easier to gain insights and improve the efficiency of their automation workflows.
Key Features of the Automation Center
- Overview Tab: The Overview tab in the Automation Center gives you a clear, high-level view of their automation performance. It tracks all related cloud and desktop flow runs, allowing you to monitor the entire process from start to finish. With insights on total runs, success rates, and key performance metrics, you can quickly identify trends, ensure smooth operations, and optimize workflows for better efficiency.
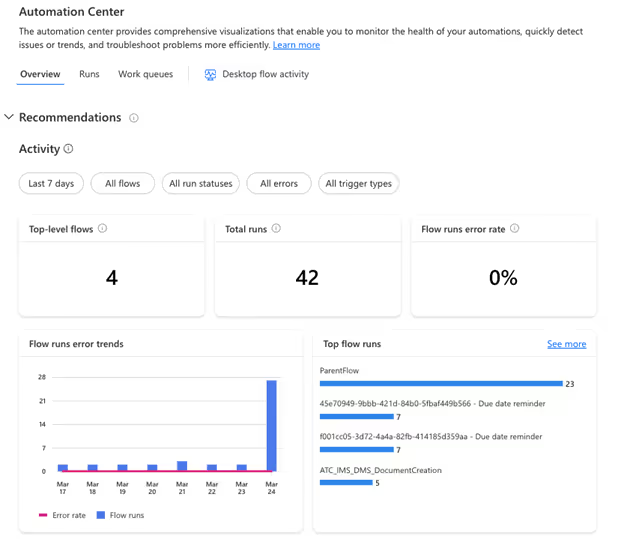
- Runs and Process Map Pages: These pages provide clear visuals and data on your cloud and desktop automation runs, helping you quickly see if your workflows are successful or need attention. With detailed insights into each step, business users can make informed decisions to improve efficiency and ensure smooth operations.

- Recommendations: The Automation Center provides proactive and reactive suggestions to enhance the reliability, efficiency, and general health of your automation. These recommendations follow the best practices and offer actionable insights to improve your workflow.
- Integrated Copilot: The Automation Center includes an integrated copilot that assists you in navigating the platform and optimizing their automation processes. The copilot provides guidance and support, making it easier for you to manage their workflows effectively.

- User-Friendly Interface: With its intuitive dashboard and user-friendly interface, the Automation Center enables users to access and analyze automation-related data effortlessly. The platform's design ensures that users can quickly find the information they need and take appropriate actions to optimize their workflows.

Boosting Your Business with the Automation Center in Power Platform
In your Microsoft 365 Tenant, there may be a lot of workflows running numerous times every day some execute automatically,

What is PowerApps and How Can It Benefit Your Business?
Feeling overwhelmed by repetitive tasks? Struggling with outdated systems that are slowing down your workflow? In today's fast-paced business environment, streamlining workflows and boosting productivity is crucial for success. This is where PowerApps comes in.
PowerApps is a powerful low-code development platform from Microsoft. It helps you to develop customized business applications without requiring a deep understanding of coding. Think of it as a user-friendly tool that allows you to build solutions specifically tailored to your unique needs.
Here are just a few key benefits of using PowerApps
- Increased Efficiency: Automate repetitive tasks and manual processes, freeing up valuable time for your team to focus on higher-level work.
- Improved Productivity: Streamline workflows and provide employees with the tools they need to get things done faster and more efficiently.
- Enhanced Collaboration: Facilitate teamwork and information sharing through collaborative applications that connect your workforce.
- Reduced Costs: Save time and money by building custom solutions in-house, instead of relying on expensive traditional development or third-party software.
- Scalability and Flexibility: PowerApps applications can grow and adapt alongside your business needs, ensuring your tools continue to support your evolving workflows.
Top 10 PowerApps Templates to Streamline Your Workflow
Now that you understand the power of PowerApps, let's explore some of the most valuable pre-built templates available. These Free PowerApps Templates offer a great starting point to address common business challenges and can be easily customized to fit your specific needs.
1. Expense Tracker
Say goodbye to paper receipts and manual expense reports! This user-friendly template allows employees to easily capture and submit expense details on the go, with automatic calculations and clear categorization. Managers can review and approve submissions within the app, saving everyone time and frustration.
2. Inventory Management
Never run out of stock again! This template provides real-time insights into your inventory levels. Track product details, quantities, and reorder points, all within a centralized and accessible platform. Generate reports to identify trends and optimize your ordering process for maximum efficiency.
3. Leave Request and Approval
Streamline your leave request process with this intuitive template. Employees can submit requests with clear details and justifications, while managers can review and approve or deny leave electronically. Automated notifications keep everyone informed throughout the process, eliminating the need for email back-and-forth.
4. Customer Relationship Management (CRM)
Build stronger customer relationships with a custom CRM template. Track customer interactions, manage leads, and oversee sales pipelines, all within a user-friendly interface. This template allows you to centralize customer data, personalize interactions, and improve overall customer satisfaction.
5. Survey and Feedback
Capture valuable insights from employees, customers, or stakeholders with a customizable survey template. Design surveys with various question formats, gather real-time data, and analyze results visually. Utilize this feedback to improve processes, identify areas for improvement, and gain a deeper understanding of your target audience.
6. Asset Management
Keep track of your company assets with this comprehensive template. Log asset details, track maintenance schedules, and monitor locations, all within a central platform. This streamlines asset management, reduces loss, and ensures preventative maintenance is performed on time.

Supercharge Your Workflow: Top 10 PowerApps Templates and How They Benefit Your Business
Feeling overwhelmed by repetitive tasks? Struggling without dated systems that are slowing down your workflow? In today's fast-paced business environment,

Introduction
In the modern era of data management and analysis, seamless integration between platforms is paramount. SharePoint, a widely used collaboration tool, often houses valuable data that organizations need to leverage for decision-making. Power Pages, on the other hand, offers robust capabilities for data visualization and analysis. By syncing data from SharePoint lists to Power Pages tables, organizations can streamline workflows and enhance data-driven insights. Below are step-by-step instructions on how to achieve this synchronization effortlessly.
This is my SharePoint library which I’m going to sync it to Power Pages

- Go to Power Pages and select "Table" in the Data section.

- Opt for "New table from external data".

- If a Sharepoint connection exists, choose it; otherwise, create a new connection and proceed.

- Input the SharePoint List URL for data retrieval, then click "Next".


- Select the desired list from the available options on the site.

- Provide a display name and proceed by clicking "Next".

- Complete the setup by clicking "Finish".

- Once done, the selected list will be visible in the Data section.

- All items from the list will populate in Power Pages table.
- Additionally, you can add new items or update existing ones, and these changes will be automatically synced.


Conclusion
Efficient data management is crucial for organizations aiming to stay competitive in today's dynamic business landscape. By syncing SharePoint list data to Power Pages tables, organizations can harness the power of their data seamlessly. This synchronization process enables users to access, analyze, and update SharePoint data within the familiar interface of Power Pages, thereby enhancing productivity and facilitating informed decision-making. With these steps, organizations can unlock the full potential of their data assets, driving innovation and growth.

Step-by-Step Guide: Syncing SharePoint List to Power Pages Table
In the modern era of data management and analysis, seamless integration between platforms is paramount. SharePoint, a widely used collaboration tool,

Prerequisites
- Access to Power Automate
- Published Dataset
- Power BI Desktop
Power BI and Power Automate have emerged as powerful tools to harness the potential of data. In this blog post, we'll explore a practical scenario where you can seamlessly send notifications based on Power BI data using Power Automate. Specifically, we'll walk through the process of sending notifications to users who haven't logged their work hours, demonstrating the efficiency and ease of integrating these Microsoft Power Platform tools.
Example: Work Hours Tracking Notification
This example demonstrates how to send an email notification to users who haven't logged their worked hours:
Steps 1: Power BI Desktop
To start the process, open the report in Power BI Desktop and follow these steps:
- Create a new tab: Add a "Power Automate" tab or any descriptive name.
- Add Visual: Add a table Visual from the visualization pane
- Apply filters: Select "Visualizations"> "Filters" and create a filter where "Logged Hours" equals 0.

- Performance Analysis: Navigate to the Optimize tab and select Performance Analyzer. Start recording, then click Refresh Visual to capture and analyze the query.


- Copy Query: Once the performance analysis is complete, copy the generated query. This will be crucial for the subsequent steps in Power Automate.
Step 2: Power Automate Integration
Now, let's seamlessly integrate Power BI data with Power Automate to automate notifications:
- Create a flow: Click "Create" > "Scheduled Cloud Flow".
- Set the frequency: Choose the desired interval for checking (e.g., daily, hourly).
- Add a trigger: Search for "Power BI" > "Run a query against a dataset."
- Select the workspace and then choose the dataset from the dropdown menu.

- Input Query Text: Paste the previously copied query from Power BI Desktop into the Query Text field. This ensures that Power Automate retrieves the specific dataset based on your defined criteria.
- Parse the retrieved data.
- Condition Check (Optional): Set up any additional condition to check if needed.

- Send Notification: Add Send an email action to send a notification.
Schedule Your Expert Session
Are you on the lookout for top-tier Power BI consultancy or specialized Power Automate consulting services to enhance your business's data management and automation strategies? Look no further! Our team of seasoned experts is here to guide you through the complexities of data visualization and process automation, ensuring your business leverages the full spectrum of capabilities offered by Power BI and Power Automate.
Don't miss this opportunity to transform your data strategy and automation processes. Connect with us. Schedule your consultation today with our experts. Our dedicated support will help you navigate the evolving digital landscape, ensuring your business remains ahead of the curve. Let's work together to turn your data into your most powerful asset and optimize your workflows for maximum efficiency.

How to run a query against a dataset in power automate?
Power BI and Power Automate have emerged as powerful tools to harness the potential of data. In this blog post, we'll explore a practical scenario where you can seamlessly send notifications based on Power BI data using Power Automate.

What is data refresh in Power BI?
Power BI serves as a crucial bridge connecting raw data to analytical tools, emphasizing the importance of maintaining current datasets for accuracy. Without regular updates, data becomes outdated, leading to unreliable analytics and misguided decisions. Refreshing your data in Power BI ensures you're working with the most recent information, allowing for effective tracking of data shifts, trends, and patterns. This process not only aids in making informed decisions but also in fine-tuning strategies based on evolving data insights.
Furthermore, refreshing data in Power BI can uncover discrepancies or errors, such as issues with the data source or its linkage to Power BI, indicating potential updating failures. Addressing these discrepancies is essential for guaranteeing the precision and trustworthiness of your data analysis.
Prerequisites
- Access to Power BI service
- Access to Power Automate
- A published Power BI dataset
To ensure your Power BI reports always reflect the latest trends, automating dataset refresh is crucial. This blog explores two effective methods: Scheduled refresh and Power Automate.
Method 1: Scheduled Refresh - Simple and Straightforward
- Navigate to your Dataset: In the Power BI Service, locate the dataset you want to automate.
- Access Settings: Click on the ellipsis (...) next to the dataset name and select "Settings."

- Schedule the Refresh: Under "Semantic Model," find the "Scheduled refresh" section. Click "Enable" and choose your desired refresh schedule. Options include hourly, daily, weekly, or monthly intervals.

- Save and Relax: Click "Apply" to activate the schedule. Power BI will automatically fetch new data based on your chosen frequency.
Method 2: Power Automate - Advanced Automation
- Create a Flow in Power Automate: Click here Power Automate and sign in. Click "Create" and choose a flow template (e.g., "Instant Cloud Flow" or “Scheduled Cloud flow”).

- Connect to Power BI: Search for the "Power BI - Refresh a Dataset" action and add it to your flow.
- Select Dataset: Choose the dataset you want to refresh.

- Save and Test: Click "Save" and run a test to ensure the flow functions correctly.
For additional expert guidance or services, don't hesitate to reach out for our Power BI consulting services. Our team of skilled Power BI consultants is ready to assist you in leveraging the full potential of your data analytics and reporting needs.

How to Automatically Refresh Power BI Datasets
Power BI serves as a crucial bridge connecting raw data to analytical tools, emphasizing the importance of maintaining current datasets for accuracy.
In every business, managing documents and collaborating on files is essential. Microsoft SharePoint offers robust features to support these needs, with the Document Library being a key component. By managing your SharePoint Document Library effectively, you can significantly enhance your document handling experience.
Understanding and Creating a Document Library in SharePoint
A SharePoint document library provides a secure and easily accessible place for you and your team to store, collaborate on, and access documents from any device. For example, you might use a document library on a SharePoint site to consolidate all files related to a specific project or client. Adding files to the library or moving data between folders is as simple as dragging and dropping.
Step-by-Step guide for document library creation
Creating a document library in SharePoint is a straightforward process that can greatly enhance your organization's document management capabilities. Here’s a step-by-step guide to get you started:
Step 1: Log in to Your SharePoint Site
- Access your SharePoint site by logging in with your credentials.
- Ensure you have the necessary permissions to create a document library.
Step 2: Navigate to Site Contents
- Once logged in, Select ‘Site Contents’ on the top right-hand side.
Step 3: Create a New Document Library
- In the Site Contents page, click on ‘+ New’ and then select ‘Document library’ from the options.
- This action will prompt you to create a new document library.


- Select ‘Blank document’ and proceed.
Step 4: Configure Your Document Library

- Enter a name for your document library. Choose a name that clearly represents the type of documents it will contain.
- Optionally, you can provide a description for the library to give more context to its users.
- Decide whether to display this library on the site navigation.

Step 5: Add Documents to Your Library
- Navigate back to your document library.
- You can upload documents by clicking on ‘Upload’ and selecting the files from your computer.
- Alternatively, you can drag and drop files directly into the library.

Step 6: Organize and Manage Documents
- Use the features of the document library to organize your files. Create folders or use metadata columns to categorize your documents.
- Set up views to display your documents in the most useful way for your team.
Step 7: Share and Collaborate
- Share your document library or individual documents with team members.
- Utilize SharePoint’s collaboration features like co-authoring and comments to collaborate on documents.
Step 8: Access and Use Your Document Library
- Access your document library anytime from the SharePoint site.
- Use the library to store, share, and manage your documents effectively.
Conclusion
In our guide on establishing a well-structured document library in SharePoint, we've gone beyond mere file storage. We provide a roadmap for equipping your team with a dynamic platform that enhances both collaboration and data management. Our comprehensive blog post, "How to Create a Document Library in SharePoint," offers insights into elevating your document management strategies, pushing your organization towards heightened efficiency, clarity, and achievement.
By following these steps, you can set up a well-organized, easy-to-use document library that enhances your team’s productivity and collaboration. Creating a document library in SharePoint can significantly improve how your team stores and accesses important documents. Remember to take advantage of SharePoint’s robust features to get the most out of your document library.
As the digital world evolves, embracing new methodologies becomes crucial. With SharePoint Designs, you're at the forefront of a robust SharePoint environment, driving productivity amidst the ever-evolving dynamics of contemporary business. Should you need additional technical support, please don't hesitate to contact us at sales@sharepointdesigns.com

How to Create a Document Library in SharePoint – A Step-by-Step Guide
In every business, managing documents and collaborating on files is essential. Microsoft SharePoint offers robust features to support these needs,

What is List?
In SharePoint, a list is essentially a structured set of data, serving as a dynamic platform for you and your colleagues to systematically arrange and access various types of information. You can think of it as like a spread sheet, but with more advanced and integrated features. SharePoint lists allow you to store, share, and manage data – these can be contacts, calendar appointments, tasks, or any other type of information. Lists in SharePoint come with the added benefits of being customizable, supporting various data types (like text, choice, date), and being able to integrate with other Microsoft services, such as PowerApps and Power Automate, for enhanced functionality. They are essential tools for collaboration and data management within the SharePoint environment.
How to create a list in SharePoint?
1. Sign into your SharePoint Site:
- Navigate to your SharePoint site and log in with your credentials.
2. Create site using the create site option

- Select the site type.

- Select a template

- Click Use Template to apply.
- Give a unique name to the site and unique site address will be created and then click Next!

- Select language you want and select create site.
- Then your site will be created and look like this!

3. Create a New List:
- Click on + New, and then select List from the dropdown menu.

- Select the Blank list Or Whatever you want. Here I go with Blank list.

4. Set Up Your List:
- Enter a name for your list.
- Optionally, you can add a description.
- Choose whether to show this list in site navigation.

5. Customize the List:
- Once the list is created, you can add columns by clicking on Add column.
- Choose the type of column (e.g., text, number, date).
- Provide a name for the column and set any additional settings as required.

6. Enter Data into Your List:
- Click on New to add items to your list.
- Fill in the fields for each new item you add.
- Click Save and your data will be added to your list.

- You can also edit your list using Grid view and if it’s not needed you can exit.

7. To change List name
- Click on the list name.
- Go to Column Setting and Select rename
- Rename your list name whenever you need!

8. Save and Share Your List:
- After adding your items, click Save.
- You can share your list with others by clicking on the Share button.
- If you want to export the list and you can dousing Export

9. Customize Views (Optional):
- You can create custom views to filter, sort, and display your data in different ways.
10. Integration:
- You can integrate your list with Power Apps and Power Automate integration if needed.

Final thoughts!
SharePoint lists are a key component in organizing and tracking critical information, making them a cornerstone of effective SharePoint consulting services. These lists integrate seamlessly with Microsoft PowerApps, Power Automate, and Microsoft Teams, amplifying their functionality. For professionals on the go, SharePoint's mobile applications for iOS and Android ensure you can manage your lists from anywhere. Mastering the creation of SharePoint lists is a simple yet impactful skill.
If you encounter any queries or need guidance on SharePoint lists, our SharePoint consultants at SharePoint Designs are ready to assist. Schedule a free consultation, feel free to reach out to us at sales@sharepointdesigns.com

How to create SharePoint list - A step-by-step Guide
In SharePoint, a list is essentially a structured set of data, serving as a dynamic platform for you
Are you ready to revolutionize your organization’s document management? SharePoint Document Library is the key to unlocking unparalleled efficiency and collaboration capabilities. In this blog post, you will learn how to maximize productivity with essential SharePoint Document Library tactics, from organizing your library to enhancing collaboration with co-authoring and version control.
Key Takeaways
- SharePoint Document Libraries offer enhanced organization, collaboration and integration capabilities for improved document management.
- Leverage metadata fields, content types and logical folder structures to maximize productivity in a SharePoint Document Library.
- Establish secure sharing practices to ensure the integrity of documents stored in a centralized document center.
- Utilize SharePoint Syntex for advanced content understanding and automation. SharePoint Syntex uses advanced AI and machine teaching to amplify human expertise, automate content processing, and transform content into knowledge. It delivers innovative experiences for understanding content, enabling teams to capture, use, and reuse expertise.
Understanding SharePoint Document Libraries

SharePoint Document Libraries, powered by SharePoint Server, are engineered to optimize employees’ time and effort by streamlining the management, storage, and prompt access of documents within a site collection. Compared to a different document library filled with file cabinets and physical folders, a modern SharePoint Document Library provides a secure, centralized repository that allows employees to store, edit, and access documents from any device.
Documents in SharePoint Document Library can be organized using the following methods:
- Folders
- Lists
- Document sets
- Meta tags
Best practices suggest keeping the document volume under 10,000 and having a robust SharePoint document management plan.
Defining a Document Library
A SharePoint Document Library is a centralized repository for the storage and management of documents, which supports various types of documents, including spreadsheets, images, and audio files, and enables users to share these documents with other users on the SharePoint site. Metadata and version control are provided in a single document library, allowing for efficient organization and management of documents.
A SharePoint Document Library is structured using metadata to facilitate document retrieval, with a focus on centralizing and reusing content whenever possible, such as in a document center site. This approach to document library organization ensures efficient management of SharePoint documents.
Document Libraries vs. Folders
While folders are used for categorizing files within a Document Library, Document Libraries offer a more extensive framework for administering documents and folders. The primary benefits of utilizing Document Libraries instead of Folders in SharePoint include:
- Efficient organization with metadata fields
- Seamless collaboration
- Granular access control
- Advanced features such as workflows and version history, which help manage documents effectively.
It is recommended to use a flat folder structure with one layer of broad-category folders within a broader-category document library, allowing for efficient organization and documents management in one document library. Content types, on the other hand, are a classification of documents that use metadata such as department name, file type, modified by, date of creation, etc., to provide more specific information.
Document Libraries vs. Lists
Lists store data in tabular format, while Document Libraries manage files, documents, document sets, or folders. A SharePoint Document Library offers functions such as storing and organizing files, collaboration, offline syncing, metadata, and integration with other tools.
In contrast, a SharePoint List offers the following functions:
- Storing and organizing data
- Allowing users to add, edit, and delete items
- Sorting and filtering data
- Creating custom views
- Automating processes with workflows
- Creating calculated columns and formulas
- Collaborating and sharing lists
- Integrating with other SharePoint features and applications.
To leverage Document Libraries and Lists together in SharePoint, users can utilize dynamic filtering and combined views, promoting collaboration and organization, and optimizing productivity.
Organizing Your SharePoint Document Library

For effective document management in your SharePoint Document Library, implementing a logical folder structure, leveraging metadata for organization, and utilizing content types are key. By organizing content within SharePoint Document Libraries using these methods, you can ensure that your library is easy to navigate and aligns with your organization’s needs, allowing users to easily find and access documents.
Creating a Logical Folder Structure
A logical folder structure in SharePoint Document Library refers to the organization and arrangement of folders within the library that facilitates navigation and document retrieval. It involves creating a hierarchical structure of folders that aligns with the organization’s needs and structure, allowing for effective categorization and retrieval of documents.
To create a logical folder structure in a SharePoint Document Library, navigate to the SharePoint site, open the Document Library where you wish to create the folders, click the “+ New” button, select “Folder” from the dropdown menu, enter a name for the folder, and click “Create”. When structuring folders, it’s recommended to keep the folder structure flat, use brief and descriptive folder names, avoid nesting subfolders more than three levels deep, avoid spaces or special characters in folder names, and utilize meta tags or data columns for document tagging.
A well-structured folder system can:
- Boost navigation and organization
- Promote collaboration
- Ascertain that files are stored in the appropriate location
- Simplify the process for team members to locate and collaborate on shared documents.
Leveraging Metadata for Organization

Metadata improves the searchability of documents in SharePoint Document Libraries by providing additional information about the documents, enabling users to search for documents based on certain attributes or tags associated with the metadata. Users can leverage each metadata column to facilitate navigation and file discovery, thus enabling them to find documents based on specific criteria, such as client, department, or date.
Incorporating metadata into SharePoint Document Libraries can lead to enhanced document management productivity.
Implementing Content Types
Content types provide information related to individual items in SharePoint Document Libraries, helping to establish filters in views and optimize organization and productivity. Content types can be accessed in SharePoint Document Library by configuring metadata navigation settings, adding columns from existing site columns, and switching the default experience.
Utilizing content types across sites, lists, and libraries in your collection can lead to a more organized and efficient SharePoint Document Library.
Permissions and Security in SharePoint Document Libraries
Maintaining the integrity of your documents and preventing unauthorized access requires ensuring security and proper access control in your SharePoint Document Library. Configuring permission levels, implementing item-level security, and practicing secure sharing are all essential components of a secure SharePoint Document Library.
Configuring Permission Levels
To modify a user’s permission level in a SharePoint Document Library, follow these steps:
- Access the Document Library.
- Select the ‘Settings’ (gear icon).
- Choose ‘Library settings’.
- In the ‘Permissions and Management’ section, select ‘Permissions for this document library’.
- Locate the user whose permission level is to be adjusted.
- Select the user.
- Click on ‘Edit User Permissions’.
- Choose the desired permission level.
- Select ‘Save’ to apply the changes.
Configuring permission levels allows you to restrict user access and uphold security in your SharePoint Document Library.
Item-Level Security
Item-level security in SharePoint Document Libraries enables users to set permissions on individual items within the library, providing a more granular level of security and control. This allows users to have different levels of access, edit, or view specific items within the library.
To implement item-level security in SharePoint Document Libraries, follow these steps:
- Navigate to the List Settings.
- Select Advanced Settings.
- Scroll down to the Item Level Permissions section.
- Enable the option for Item-level permissions.
- Assign the specific permissions for each item in the library.
By implementing item-level security, you can ensure that sensitive or confidential documents are only accessible to authorized individuals.
Enabling item-level permissions allows for managing access to individual items within the document library based on user roles and permissions.
Secure Sharing Practices
Practicing secure sharing is essential for maintaining the integrity of your documents and preventing unauthorized access. To grant appropriate permissions for secure sharing in SharePoint Document Libraries, follow these steps:
- Right-click on the file that requires permission.
- Select ‘Manage access’ from the context menu.
- Enter the email addresses or group names of the users or groups that require access.
- Select the appropriate permission level for each user or group.
- Click ‘Share’ to grant the permissions and securely share the document.
Following these steps ensures that your documents are shared securely and exclusively with the appropriate users.
Enhancing Collaboration with Co-Authoring and Version Control

Co-authoring and version control, integral features in SharePoint Document Libraries, allow multiple users to work on documents simultaneously while maintaining a comprehensive history of document changes. By implementing co-authoring, version control, and the check-out system, you can enhance collaboration and maintain control over document editing in your SharePoint Document Library.
Co-Authoring Capabilities
SharePoint Document Library provides co-authoring capabilities that enable multiple users to access the same document concurrently, enhancing collaboration, and increasing productivity. Utilizing co-authoring in SharePoint Document Libraries offers benefits such as:
- Heightened productivity
- Version control
- Improved communication
- Flexibility and accessibility
However, one should note that the advisable maximum number of concurrent editors for co-authoring a document in SharePoint is 10, with a boundary of 99, but there is no definitive limit to the number of users who can co-author a document.
Managing Document Versions
Versioning in SharePoint Document Library enables the storage and tracking of multiple versions of a document, allowing users to monitor changes made to a document, view previous versions, and restore or compare different versions if necessary. To enable versioning in a SharePoint Document Library, one can navigate to the Library Settings or List Settings and select the Versioning settings, which will allow for the enabling of versioning and the setting of versioning limits.
Utilizing document versioning enables users to locate the appropriate files swiftly, refine their search results, and navigate through the document library more effectively.
Check-Out System
The Check-Out system in SharePoint Document Library enables users to reserve a file for exclusive editing, preventing other users from accessing the file while someone is already editing it. The Check-Out system facilitates the prevention of conflicts and the maintenance of control over document editing by allowing users to ‘check out’ a document prior to making any changes, ensuring that only one person can make alterations at any given time. However, there are limitations to the Check-Out system, such as the maximum number of items that can be checked out, the total storage limit across all synced devices, and the length of URLs and file paths.
Streamlining Processes with SharePoint Document Library Automation
Automation in SharePoint Document Libraries allows for more efficient document management through features such as workflows, Power Automate integration, and alerts and notifications. By streamlining processes, SharePoint workflows save time, increase efficiency, and reduce the risk of human error, ultimately enhancing the overall document management experience.
Setting Up Automated Workflows
Automated workflows are processes that are activated upon certain conditions or events and can be utilized to optimize and automate common business processes, such as project approval or document review.
To set up automated workflows in a SharePoint Document Library, follow these steps:
- Open Power Automate.
- Navigate to the SharePoint site where you want to create the workflow.
- Click on ‘Create’.
- Select ‘Automated flow’ or ‘Instant flow’ depending on your requirements.
- Choose the trigger that will start the workflow.
- Add actions to the workflow.
- Configure the actions by providing the necessary inputs and parameters.
- Customize the workflow logic.
- Test the workflow.
- Save and publish the workflow.
Power Automate Integration
Power Automate is a workflow automation tool that enables you to create automated processes and workflows in SharePoint Document Libraries, facilitating processes by automating repetitive tasks, such as creating document libraries, initiating approval flows when new files are added, retrieving files from libraries, and more.
Utilizing Power Automate can save time and enhance productivity by automating manual processes in SharePoint Document Libraries.
Alerts and Notifications
Alerts and notifications in SharePoint Document Libraries enable users to receive updates and notifications regarding changes and activities occurring in a SharePoint Document Library, allowing users to configure alerts to be notified when new documents are added, documents are modified, or when specific criteria are met. These alerts can be established at the library level or at the individual document level, ensuring users stay informed about document changes and updates.
Advanced Features and Customization of SharePoint Document Libraries
SharePoint Document Libraries feature advanced options and customization opportunities that can boost user experience and productivity. By incorporating the following customizations, you can create a tailored and efficient Document Library that meets your organization’s specific needs and preferences:
- Custom views
- Filters
- Library settings
- Web parts
Custom Views and Filters
Custom views provide the ability to alter the sort order of documents and folders, display or conceal particular columns, or filter the information in specific ways, allowing users to quickly and easily locate and access specific content based on certain criteria.
Utilizing custom views and filters allows users to enhance navigation and productivity within the document library.
Library Settings and Configuration
Properly configuring library settings in SharePoint Document Libraries is essential for ensuring that your library operates efficiently and meets your organization’s needs. Best practices for configuring a SharePoint Document Library include:
- Determining the library type based on specific needs
- Capturing organizational knowledge and best practices in the library
- Planning for content governance
- Setting appropriate permissions for the document library to ensure proper access control
Adding and Using Web Parts
Web Parts in SharePoint Document Library are components that can be integrated into a SharePoint page to display and interact with documents and files stored in a document library. Users can leverage web parts to create new folders and documents, upload files and folders, and carry out various operations related to document management.
Incorporating web parts into your SharePoint Document Library can enhance functionality and elevate user experience.
Optimizing File Management and Access
Efficient file management and access in your SharePoint Document Library can be realized through features such as bulk upload, OneDrive synchronization, and thumbnail views. By implementing these features, you can optimize your document library for easier file identification, navigation, and collaboration.
Bulk Upload and Drag-and-Drop Features
The bulk upload and drag-and-drop features in SharePoint Document Library enable users to upload multiple files simultaneously, streamlining the process of adding files to the library and increasing productivity. To utilize these features, navigate to the SharePoint site, open the Document Library, click the “+ New” button, select “Folder” from the dropdown menu, enter a name for the folder, and click “Create”.
Remember that the file size limits for bulk upload and drag-and-drop in SharePoint Document Library are a maximum of 100 GB total file size, no more than 30,000 files, and each file should not exceed 15 GB.
Synchronizing Files with OneDrive
Synchronizing files with OneDrive provides the following benefits:
- Seamless access to SharePoint files without the need to log into SharePoint Online
- The ability to work on SharePoint files offline and synchronize changes when connected to the internet
- Improved productivity and connectivity
- Extended storage space
- Tracking file activity and version history
Integrating OneDrive with your SharePoint Document Library can boost collaboration, enhance file management, and ensure your documents are always updated and accessible.
Thumbnail View and Previews

Thumbnail view and previews in SharePoint Document Library enable users to view a visual preview of their files, providing rapid visual recognition and efficient browsing. However, there are limitations to using thumbnail view and previews in SharePoint Document Library, such as SharePoint Online Picture Library may not display thumbnail previews, and loading image thumbnails in SharePoint libraries may be slow when using Windows Explorer with WebDAV technology.
Establishing a Single Source of Truth
A single source of truth is crucial for efficient document management. It ensures that end users can locate documents when needed and maintains a consistent and accurate record of document changes. By centralizing documents in a SharePoint Document Center, addressing challenges, and implementing solutions, you can establish a single source of truth for your organization and optimize your document management processes.
Benefits of a Centralized Document Center
A centralized Document Center in SharePoint offers numerous benefits, such as:
- Centralized storage and management
- Automation of document processes
- Simplified access and sharing
- Enhanced collaboration and inter-departmental cross-referencing
- Increased efficiency in document management.
Implementing a centralized Document Center in your organization can ensure all users have access to the most current and accurate information, leading to enhanced productivity and collaboration.
Challenges and Solutions
Maintaining a single source of truth in a SharePoint Document Center presents challenges such as:
- Ensuring a single source of truth is maintained
- Controlling certain areas
- Guiding users to enter the correct data
- Addressing poor document management practices
Configuring permission levels, implementing item-level security, and practicing secure sharing can help address these challenges and ensure that your SharePoint Document Center remains a reliable and accurate information source for your organization.
Summary
In conclusion, SharePoint Document Library offers a powerful solution for organizations to optimize their document management processes. By implementing the essential tactics discussed in this blog post, such as organizing your library, enhancing collaboration with co-authoring and version control, streamlining processes with automation, customizing your library with advanced features, and establishing a single source of truth, you can revolutionize your organization’s document management and unlock unparalleled efficiency and collaboration. It’s time to harness the full potential of SharePoint Document Library and take your organization’s productivity to new heights.

Maximizing Productivity with SharePoint Document Library: Essential Tactics
SharePoint Document Library is the key to unlocking unparalleled efficiency and collaboration capabilities.

Once you've created a report in Power BI, you can easily share it with others by embedding it into a SharePoint site page. This allows your colleagues and collaborators to view your report with out having to access Power BI directly.
Prerequisites
- A Power BI report published to the Power BI service.
- A SharePoint site with access permissions.
- Power BI web part installed on the SharePoint site.
Steps to Embed a Power BI Report into a SharePoint Site Page
1. Open the SharePoint site page where you want to embed the report.
2. Click the Edit button in the top right corner of the page.
3. Click the + New button in the top left corner of the page.
4. Search for and select the Power BI web part.

5. Click the Add report button.
6. Copy the embed URL of the Power BI report you want to embed. You can find the embed URL by opening the report in Power BI, clicking the File tab, and then selecting Embed in SharePoint Online.

7. Paste the embed URL into the Power BI report link field in the web part properties pane.
8. Select the Show Filter Pane and Show Navigation Pane checkboxes if you want these features to be visible in the embedded report.

9. Click the Publish button to publish the SharePoint page and make the embedded report visible to others.
Explore our previous blog, The Ultimate Step-by-Step Guide to Power BI Report Creation for a detailed walk through on crafting reports in Power BI. Dive into the steps for expert insights. Connect with our Power BI Consultants for expert guidance on embedding reports in SharePoint. For more insights like this, join our weekly newsletters and follow our blog updates.

Easy 9 Steps Guide to Embed Power BI Report in SharePoint
Once you've created a report in Power BI, you can easily share it with others by embedding it into a SharePoint site page.
Navigating Microsoft Copilot: A Guide to Its Products
Microsoft’s AI offerings, such as Bing Chat and Microsoft 365 Copilot (including GitHub Copilot), are paving the way for a more productive future. These intelligent tools simplify tasks through features like conversational bots and custom searches tailored to your needs. Let’s explore how you can use Microsoft Copilots to optimize your workflow today.
The Pioneers of AI Productivity
Microsoft integrates AI across its products, making them user-friendly and intuitive.
- Bing Chat leverages large language models within Microsoft Edge.
- Integration with Microsoft Graph ensures seamless connection between apps and services.
Available Across:
- Bing
- Edge
- Microsoft 365
- Windows (Windows Copilot)
Microsoft recently launched a Copilot, offering a unified AI productivity experience in Windows 11, allowing users to manage tasks and settings through a centralized assistant.
1. Best for Integrated OS Experience - Microsoft Copilot
Microsoft Copilot in Windows 11 offers:
- AI-powered assistance integrated into Windows 11
- App launching and system setting adjustments (volume, dark mode) via voice command
- Bing Chat Enterprise integration for combining web and work data
IT admins can deploy Copilot with access control, ensuring security and personalization.
2. Best for Conversational AI - Bing Chat
Microsoft Edge + Bing Chat:
- Ideal for remote work and flexible workflows
- Powered by Open AI’s GPT-4 for deep understanding
- DALLE 3 generates activity-specific images
- Free and always available at bing.com/chat
Microsoft continues improving Bing Chat to reduce hallucinations and enhance reliability.
3. Best for Office Productivity - Microsoft 365 Copilot
Microsoft 365 Copilot boosts productivity in Teams, Word, Outlook, Excel, and PowerPoint:
- Generate text and tables in Word
- Summarize and draft emails in Outlook
- Create Python visualizations in Excel
- Access insights in OneDrive without opening files
Enterprise Plan: $30/user/month – offering:
- Intelligent writing assistance
- Advanced data analysis and visualization
- Personalized productivity insights
- Automated email management
- Voice dictation and transcription
Integration ensures a streamlined experience across Microsoft 365 apps for everyday efficiency.
4. Best for Modern Computing - Windows 11
Windows 11 offers:
- Modern UI with upgraded Start menu and Taskbar
- Microsoft Copilot for AI assistance in system settings
- Gaming features: Game Bar, Direct Storage, Auto HDR, Game Mode, Game widget store, Xbox app
Access to Android apps via Windows Subsystem for Android and Amazon Appstore
5. Best for Developers - GitHub Copilot
GitHub Copilot helps developers:
- Get real-time code suggestions
- Work with multiple programming languages
- Reduce errors and accelerate workflows
Supported languages:
- JavaScript, Python, C#, C++, Java, PHP, Ruby, Go
- Pricing: $10/month or $100/year.
Powered by OpenAI Codex, Copilot translates comments or code lines into natural language.
Choosing Your AI Copilot
- Microsoft Copilot: For unified AI in Windows 11
- Bing Chat: For advanced conversational AI
- Microsoft 365 Copilot: For office productivity and automation
Select the copilot that fits your specific workflow needs.
Summary
To sum up, Microsoft’s AI copilots can provide the perfect solution for any need. Ranging from workplace efficiency to coding and regular computing. By understanding how these tools differ, you can decide which works best in accordance with your requirements and take advantage of all the features that this technology has to offer.
Welcome to a new era with an AI-driven productivity upgrade due to its empowering capabilities. Take full control over every aspect of your job thanks to artificial intelligence - don’t miss out on such groundbreaking opportunities!
Ready to harness AI in your workflow?
Contact us for Microsoft Copilot Consulting Services and elevate your productivity. Embrace AI-driven solutions tailored for your needs get in touch now!

Mastering Microsoft Copilot: Your Complete Product Guide
Microsoft’s AI offerings, such as Bing Chat and Microsoft 365 Copilot (also known as GitHub Copilot), are paving the way for a more productive future.
Power BI is a business intelligence (BI) tool that allows you to connect to your data, create visualizations, and share insights with others.
Prerequisites
- Power BI Desktop installed on your computer.
- A dataset that you want to connect to. (Here we will use SharePoint List)
Step 1: Connect to Your Data
The first step in creating a report is to connect to your data. Power BI can connect to a variety of data sources, including Excel spreadsheets, CSV files, SQL databases, and cloud services like OneDrive and many more.
To connect to your data,
- Open Power BI Desktop and click on the Get Data button.
- Click more and select Online Services -> SharePoint Online List.

- Follow the prompts to connect.
Step 2: Create Visualizations
Once you have connected to your data, you can start creating visualizations. Power BI offers a wide variety of visualizations, including charts, graphs, maps, and pie charts.
To create a visualization, Click a visual from the Visualizations pane. Power BI will automatically create a visualization based on the visual that you selected.

To Add Data into to visual:
- Under Data Pane, Expand the Data Source (Timesheet)
- Drag and drop the fields into the visual as per your need.

Step 3: Add Filters and Slicers
Filters and slicers allow you to narrow down your data and see specific results. To add a filter, click on the Add Filter button in the Filters pane. To add a slicer, click on the Add Slicer button in the Visualizations pane.


Now you can also use slicer as a filter to play around with the table.
Similarly, you can also use slicer as a filter for the other columns available in your Data Source.
Step 4: Format Your Report
Once you have added your visualizations, filters, and slicers, you can format your report to make it look its best. You can change the font, colors, and layout of your report.
To format your report, click on the Format tab in the Visualizations pane. You can then make changes to the appearance of your report.

Step 5: Final Output

Step 6: Share Your Report
Once you are satisfied with your report, you can share it with others. Power Business Intelligence offers a variety of ways to share your report, including exporting it to a PDF file, publishing it to a webpage, or sending it via email.
- To share your report, click on the File tab in the top menu bar and select Share. Choose the sharing method that you want to use.
- To Publish your report, click Publish on the Top right and select the destination to publish your report.
Explore our blog, 'Easy 9 Steps Guide to Embed Power BI Report in SharePoint' for a comprehensive step-by-step guide on seamlessly integrating Power BI reports into SharePoint.
Join our weekly newsletters and regular blog updates for the latest insights and tips. Connect with our expert Business Intelligence Consultants for Power BI Services. Elevate your data strategy and make informed decisions. Contact us now to transform your analytics!

The Ultimate Step-by-Step Guide to Power BI Report Creation
Power BI is a business intelligence (BI) tool that allows you to connect to your data, create visualizations, and share insights with others.
In today's rapidly evolving digital landscape, the way we work and collaborate is undergoing a significant transformation. At the forefront of this change is SharePoint Premium, a powerful tool reshaping the dynamics of business operations. As highlighted in the 2023 Work Trend Index, the integration of AI and digital tools in the workplace is not just a trend but a necessity. SharePoint Premium stands out as a pivotal platform in this journey, offering robust solutions for enhanced collaboration, streamlined processes, and informed decision-making.
Enhancing Team Collaboration
The core strength of SharePoint Premium lies in its ability to facilitate seamless collaboration across diverse teams and departments. With advanced document management capabilities and seamless integration with Microsoft Teams, SharePoint Premium breaks down silos and fosters a collaborative environment. This integration is crucial in today's context, as the 2023 Work Trend Index reveals a threefold increase in Microsoft Teams meetings and calls since 2020. SharePoint Premium ensures that collaborative efforts are more efficient and productive, irrespective of geographical boundaries.
Streamlining Business Processes
In an era where 70% of people would prefer to delegate work to AI to lessen their workloads, SharePoint Premium emerges as a key player in automating routine tasks. Its integration with Power Automate allows businesses to create custom workflows, reducing manual effort and increasing efficiency. Additionally, PowerApps enables businesses to develop custom applications tailored to their unique needs, further enhancing operational efficiency and user experience.
Data-Driven Decision Making
Data is the new currency in the business world, and SharePoint Premium provides an effective platform for consolidating, managing, and visualizing data. This capability is crucial for data-driven decision-making, aligning with the AI advancements highlighted in Microsoft Ignite 2023. SharePoint Premium's integration with various AI tools enables businesses to analyze trends, generate actionable insights, and make informed decisions swiftly.
Ensuring Security and Compliance
In the current era of AI and digital transformation, data security and compliance are more critical than ever. SharePoint Premium addresses these concerns with robust security features and compliance tools, ensuring that business data is protected and regulatory requirements are met. This aspect is particularly vital for IT managers and CTOs, who are responsible for safeguarding their organization's data integrity.
SharePoint in the Future of Work
As we look to the future, SharePoint Premium aligns perfectly with the emerging trends in AI and digital transformation. The platform is continuously evolving, integrating new AI capabilities to reshape how work is done, as indicated in Microsoft Ignite 2023. SharePoint Premium is not just a tool for today but a strategic investment for the future, empowering businesses to stay ahead in a rapidly changing digital world.
Conclusion
SharePoint Premium offers a suite of features that are essential for modern businesses, especially in the realms of collaboration, process optimization, and decision-making. For IT managers, directors, CTOs, and COOs, embracing SharePoint Premium is a strategic step towards successful digital transformation. The platform's alignment with current and future AI advancements makes it an indispensable tool for businesses aiming to thrive in the digital era.

Revolutionizing Business Collaboration with SharePoint Premium: Key Use Cases for Decision-Makers
In today's rapidly evolving digital landscape, the way we work and collaborate is undergoing a significant transformation.



.svg)