Tech Ideas & Best Practices
Rediscovering the Intranet as Our Favorite Place for Collaboration and Productivity
Remember when the company intranet was that dull place where documents went to gather dust? Well, those days are over. In today's busy work life, we're all searching for tools that not only make our jobs easier but also bring us closer as a team. And guess what? The intranet is making a heartfelt comeback.
Modern intranets have transformed into lively, interactive spaces where we can share ideas, collaborate on projects, and stay connected with each other—no matter where we are. At the forefront of this transformation is Microsoft SharePoint, a tool that's helping organizations like ours create intranets that truly feel like home.
The Intranet's Journey Back to Our Hearts
Let's be honest—old intranets weren't exactly inspiring. They were clunky, hard to navigate, and didn't offer much in terms of interaction. But times have changed, and so have intranets. They're now:
- User-Friendly: Designed with us in mind, making it easy to find what we need.
- Interactive: Encouraging conversations and collaboration among everyone.
- Integrated: Working seamlessly with the tools we already use every day.
- Accessible: Available on all our devices, so we can stay connected wherever we are.

Why We're Falling in Love with Intranets Again
- A Central Place to Connect
Our intranet is becoming the heart of our company, bringing together news, updates, and announcements in one place. It cuts down on endless emails and makes sure we're all in the loop. - Tools That Make Teamwork Easy
With features like team spaces and real-time document editing, we can work together effortlessly—even when we're miles apart. - Personal Touches That Matter
We can customize our experience, join groups that interest us, and participate in discussions. It's not just a tool—it's a community. - A Treasure Trove of Knowledge
Need to find a training guide or a company policy? It's all there, making it easy for new and seasoned team members alike. - Stay Connected on the Go
Whether we're in the office, at home, or on the move, our mobile-friendly intranet keeps us connected.
Why SharePoint Feels Like the Right Choice
When it comes to creating a modern intranet that meets our needs, Microsoft SharePoint stands out. Here's why it's making a difference:
It Fits Right In
SharePoint integrates smoothly with the Microsoft tools we already use, like Teams and Outlook. Everything works together, making our digital workspace feel cohesive.
Grows with Us
It's customizable and scalable, adapting as our organization evolves.
Makes Collaboration a Breeze
Real-time co-authoring and easy document sharing mean we can focus on working together without technical hiccups.
Keeps Our Information Safe
Security is a priority, and SharePoint provides the peace of mind we need.
Easy on the Eyes and Fingers
It's designed to be user-friendly, so we spend less time figuring out how things work and more time getting things done.
Find What You Need, When You Need It
Advanced search features help us locate information quickly, reducing frustration and saving time.
The Benefits We're Experiencing
- Getting More Done
Quick access to the tools and info we need boosts our productivity. - Communicating Openly
Transparent communication builds trust and strengthens our relationships. - Feeling Valued and Heard
When we have a platform to share our thoughts, it enhances our engagement and morale. - Saving Time and Resources
Streamlined processes help us work smarter, not harder. - Working Together Seamlessly
SharePoint's collaboration features enhance our teamwork.

Making the Most of Our Intranet
Here's how we can continue to embrace and improve our intranet experience:
- Share Your Thoughts
Let's keep communicating about what we need and how we can make our intranet even better. - Explore the Features
There's a lot to discover—don't hesitate to dive in and see what tools can help you in your daily work. - Customize Your Experience
Make it your own by following the content and groups that interest you. - Stay Engaged
Participate in discussions, share your ideas, and connect with colleagues. - Embrace Continuous Improvement
Technology and our needs are always evolving. Let's stay open to changes and updates that enhance our experience.
A Final Thought
Our intranet isn't just a tool—it's a space that brings us together. By leveraging platforms like Microsoft SharePoint, we're creating an environment where collaboration thrives, and everyone feels connected and valued.
So, how about we make the most of this powerful tool? Let's continue to embrace our intranet, share our ideas, and work together to make our workplace even better.

How Modern Intranets Like SharePoint Are Boosting Teamwork?
Remember when the company intranet was that dull place where documents went to gather dust? Well, those days are over.

Managing brand consistency across an organization can be challenging, especially when assets like logos, fonts, and colors are scattered across different departments. The SharePoint Brand Center makes this easier by centralizing your brand assets in one place, ensuring that everyone in your company has access to the right tools to keep branding consistent.
In this blog, we’ll explore how the SharePoint Brand Center works and the benefits it brings to organizations looking to streamline their branding efforts.

Summary
The SharePoint Brand Center centralizes logos, colors, fonts, and other assets in Microsoft 365 to ensure consistent branding and easy access across the organization. Key features include a central asset library, support for custom fonts in SharePoint and Viva Connections, and fast delivery via the Public CDN. Benefits span consistent branding, time savings, empowered employees, and reduced costs. Getting started requires admin activation, connecting or creating an asset library, and enabling the Public CDN.
What is SharePoint Brand Center?
The SharePoint Brand Center is a new feature within Microsoft 365 that helps organizations manage all their brand assets from one centralized location. With it, you can store logos, colors, fonts, and other branding materials in one place. Employees can then easily access these assets, ensuring that all internal and external communication follows the same brand guidelines.
Key Features:
- Central Asset Library: Store and manage your brand materials in one place.
- Custom Fonts: Use your own fonts in SharePoint and Viva Connections.
- Fast Access: Utilize Public CDN to ensure quick access to assets.

How It Helps Your Organization
1. Consistent Branding
Ensuring that your brand is consistent across all departments is crucial. The SharePoint Brand Center makes it easy by giving everyone access to the correct and up-to-date brand assets, helping prevent mistakes like using outdated logos or fonts.
2. Saves Time and Resources
Instead of employees wasting time searching for logos or templates, they can easily find everything they need in the SharePoint Brand Center. This streamlined approach frees up time for more important tasks.
3. Empowers Employees
With the Brand Center, every employee has the tools to create professional, on-brand content. This reduces the burden on marketing teams and helps maintain a unified brand identity throughout the organization.
4. Cost Savings
By centralizing your brand management, you can avoid using multiple third-party tools and eliminate redundant work. This helps save both time and money.
Getting Started with SharePoint Brand Center
Setting up the SharePoint Brand Center is simple:
- Admin Setup: A global admin activates the Brand Center in Microsoft 365.
- Create or Connect Asset Library: Use an existing library or create a new one.
- Enable Public CDN: Ensure assets are delivered quickly to all users.
Conclusion: Simplify Your Branding Process
The SharePoint Brand Center is a powerful tool that helps organizations manage their branding efforts efficiently. By centralizing brand assets, saving time, and empowering employees to create on-brand content, it can have a positive impact on both productivity and brand consistency.

Simplify Your Brand Management with SharePoint Brand Center
Managing brand consistency across an organization can be challenging, especially when assets like logos, fonts, and colors are scattered across different departments.

What is biophilic design?
The biophilic design tries to align the built environment with natural processes in a way that encourages human creativity, productivity and wellness.
It holds that people have an intrinsic connection with nature and react positively when they are able to have some elements of the natural world provided they are inside the house.
Benefits of biophilic design in UI/UX
Enhancement of User’s Well-being: By blending nature into an interface, we can achieve a more relaxing and pleasing user experience.
Improvement in Focus and Productivity: Natural designs can help decrease cognitive load thereby making it easy for users to navigate the interface which leads to improved task completion.
Increased Emotional Engagement: Biophilic principles integrated into a program may lead users to feel greater emotional connection and involvement with it.
Biophilic design has been implemented in UI/UX design
This is an innovative approach that can enhance user experience by developing interfaces reflecting the calming and refreshing aspects of nature.
Here’s how you can incorporate biophilic principles into your digital design projects:

Nature-Inspired UI/UX: Harnessing Biophilic Design for Enhanced User Experience
The biophilic design tries to align the built environment with natural processes in a way that encourages human creativity, productivity and wellness.

In SharePoint, you may want to provide users with direct access to the edit form of a particular item in a document library or list. Instead of manually navigating to the item and clicking edit, you can create a URL that redirects users straight to the edit form of the desired item.
Why Use URL Redirection for Edit Forms?
There are several scenarios where redirecting users to the item’s edit form can be useful:
Streamlined Workflows: When users need to frequently update metadata or document properties.
Task Automation: Automating the redirection for approval or review workflows.
User Convenience: Reducing the number of clicks needed to access important information.
Understanding Different Page Types in SharePoint URLs
When constructing a SharePoint URL for redirection, you can choose different Page Types to open specific forms:
- PageType=6: Opens the edit form of the item.
- PageType=4: Opens the display form (read-only view) of the item.
- PageType=8: Opens the new item form, allowing users to create a new document or list item.
Step-by-Step Guide to Creating Direct Links for Different Forms
1. Get the Item ID
Each document or item in a SharePoint document library has a unique ID, which you’ll need for opening the edit or display form.
2. Construct the URL
Here’s the general format of the URL for different forms:
https://[Your SharePoint SiteURL]/_layouts/15/listform.aspx?PageType=[Type]&ListId=[ListGUID]&ID=[Item ID]
Replace [Type] with the appropriate PageType value:
- For edit form (PageType=6)
- For display form (PageType=4)
- For new item form (PageType=8)
3. Retrieve the List GUID
To find the List GUID:
- Go to the document library or list.
- Click on "Library Settings" or "List Settings."
- The URL in your browser will contain List= followed by the GUID.
4. Example URLs
Here’s how the URLs would look for different forms:
Edit Form (PageType=6): EditForm.aspx
https://yourcompany.sharepoint.com/sites/yoursite/_layouts/15/listform.aspx?PageType=6&ListId={3B95E68C-2B4F-4A69-A307-15DF785B2E34}&ID=9

Display Form (PageType=4): DispForm.aspx
https://yourcompany.sharepoint.com/sites/yoursite/_layouts/15/listform.aspx?PageType=4&ListId=3B95E68C-2B4F-4A69-A307-15DF785B2E34&ID=9

New Item Form(PageType=8): Upload.aspx
https://yourcompany.sharepoint.com/sites/yoursite/_layouts/15/listform.aspx?PageType=8&ListId=3B95E68C-2B4F-4A69-A307-15DF785B2E34

5. Use the URL in Hyperlinks or Buttons
You can now embed these URLs in emails, buttons, or dashboard links. Depending on the PageType value, users will be taken directly to the edit, display, or new item form.
6. Key Considerations
- Permissions: Ensure users have the necessary permissions to view or edit the forms.
- Security: Avoid exposing sensitive data in the URL, and make sure permissions are correctly set.
- User Experience: Consider the user flow after opening the forms (e.g., redirection after submission).

How to Open a Specific Item's Edit Form in SharePoint Document Library Using URL Redirection
Unlock the power of SharePoint with our quick guide on using URL redirection to open a document's edit form directly.

SharePoint Syntex, a part of Microsoft 365, is an AI-driven tool that empowers organizations to automate content management processes, enhance productivity, and ensure compliance across various types of content. Whether dealing with documents, images, videos, or app-managed content, Syntex offers a suite of features designed to optimize how information is captured, processed, and utilized within your organization. This blog will explore all the key features of SharePoint Syntex, categorized under Documents & Images, Video, Storage, and App Features.
Documents & Images
1. Autofill Columns
Feature Overview: Autofill Columns allow users to add prompts to specific columns in SharePoint lists or libraries to automatically extract or generate information from the contents of files stored within those locations.
Use Case: This feature is particularly useful for automating metadata generation, ensuring consistency across documents, and reducing the manual effort required to input data into SharePoint lists. For instance, legal teams can extract contract expiration dates or parties involved directly into corresponding columns.
2. Content Assembly
Feature Overview: Content Assembly enables users to create modern templates linked to data sources, such as SharePoint lists, to generate repetitive structured documents automatically.
Use Case: Organizations can streamline the creation of standard documents like contracts, proposals, or reports by pulling data directly from structured data sources, reducing errors, and ensuring consistency in document generation.
3. Document Translation
Feature Overview: The Document Translation feature allows users to create translated copies of documents directly within SharePoint Syntex.
Use Case: This feature is invaluable for global organizations that need to maintain multilingual versions of key documents, such as company policies or marketing materials. It ensures that all employees and stakeholders have access to documents in their preferred language.
4. eSignature (SUPPORTED REGIONS ONLY)
Feature Overview: eSignature functionality within SharePoint Syntex enables users to set up PDFs for electronic signatures by internal and external stakeholders.
Use Case: This feature simplifies the process of gathering signatures for contracts, agreements, and other formal documents, reducing the need for physical document handling and expediting approval processes.
5. Image Tagging
Feature Overview: Image Tagging allows users to categorize and label images with descriptive keywords automatically.
Use Case: This feature is particularly beneficial for marketing, media, and creative teams that manage large libraries of images. By automating the tagging process, it enhances the discoverability of images and improves organization within SharePoint libraries.
6. Optical Character Recognition (OCR)
Feature Overview: OCR capabilities in SharePoint Syntex enable enhanced search functionalities by recognizing and extracting text from images within documents.
Use Case: This feature is essential for organizations that deal with scanned documents, handwritten notes, or images that contain text. It allows users to search for and retrieve information from these documents as if they were regular text documents
7. Prebuilt Document Processing
Feature Overview: Prebuilt Document Processing models in Syntex allow users to configure pretrained models to extract information from common business documents like contracts, invoices, and receipts.
Use Case: These models are pre-trained to recognize and extract structured data from standard documents, making it easy for businesses to automate document processing without the need for extensive model training.
8. Structured and Freeform Document Processing
Feature Overview: This feature lets users train custom models to extract information from structured documents like forms or freeform documents like letters and contracts.
Use Case: Organizations can tailor these models to handle specific document formats unique to their business processes, such as customer service letters or legal contracts, enhancing the precision of data extraction.
9. Taxonomy Tagging
Feature Overview: Taxonomy Tagging automates the process of tagging files using terms from your organization’s managed metadata.
Use Case: This feature helps maintain consistency in how content is categorized and retrieved across the organization, which is critical for compliance and content management.
10. Unstructured Document Processing
Feature Overview: Unstructured Document Processing allows users to train custom models to classify and extract information from a wide range of file types, regardless of format.
Use Case: This feature is ideal for organizations dealing with a diverse array of document types that do not conform to a specific structure, enabling effective content management across various departments.
Video Features
Video Transcript Translation
Feature Overview: SharePoint Syntex allows for the translation of video transcripts and closed captioning files. This feature supports multiple languages and ensures that video content is accessible to a broader audience.
Use Case: Organizations with multilingual teams can use this feature to make video content understandable across different regions by providing translated transcripts or captions, thus improving communication and training efficiency.
Storage Features
1. Microsoft 365 Archive
Feature Overview: The Microsoft 365 Archive is a long-term storage solution for inactive or historical SharePoint content. It maintains the same searchability, security, and compliance standards as active data, ensuring that archived content remains accessible and compliant with organizational policies.
Use Case: Organizations can use the Microsoft 365 Archive to store large volumes of historical data securely, which is not frequently accessed but needs to be retained for compliance purposes.
2. Microsoft 365 Backup
Feature Overview: This feature provides backup and recovery capabilities for SharePoint, Exchange Online, and OneDrive for Business. It ensures that your content is securely backed up and can be restored efficiently in case of accidental deletion or other data loss scenarios.
Use Case: Organizations requiring robust data protection strategies can rely on Microsoft 365 Backup to ensure quick recovery of critical business data, minimizing downtime and data loss risks.
App Features
1. SharePoint Embedded
Feature Overview: SharePoint Embedded is a solution that allows developers to use the SharePoint file and document storage platform within their applications. This API-only solution creates secure, isolated storage partitions within a Microsoft 365 tenant that are accessible only through the specific app that created them.
Use Case: Independent Software Vendors (ISVs) and enterprises can utilize SharePoint Embedded to manage content securely within their applications while benefiting from Microsoft 365's advanced content management features like search, sharing, versioning, and compliance.
2. App-Managed Content Experiences
Feature Overview: Content stored by applications using SharePoint Embedded does not count toward the organization's SharePoint storage quota. Instead, it is billed separately via an Azure subscription based on the total storage used and the number of API calls.
Use Case: This feature is ideal for apps that require extensive storage but need to isolate their data from the organization's general SharePoint usage. It provides a flexible, scalable, and secure storage solution.
Conclusion
SharePoint Syntex is more than just a document management tool; it is a comprehensive AI-powered platform that enhances the way organizations handle a variety of content types, including documents, images, videos, and application-specific data. By automating key processes, improving accessibility, and ensuring robust data management, Syntex empowers businesses to operate more efficiently, stay compliant, and drive innovation.
Whether you are looking to streamline document processing, improve video accessibility, manage large volumes of data securely, or integrate content management capabilities into your apps, SharePoint Syntex offers a wide range of features to meet your needs. As organizations continue to adapt to the evolving digital landscape, the adoption of tools like Syntex will be crucial in maintaining a competitive edge and achieving operational excellence.

Comprehensive Guide to SharePoint Syntex Features and Use Cases: Unlocking the Power of AI for Content Management
SharePoint Syntex, a part of Microsoft 365, is an AI-driven tool that empowers organizations to automate content management processes, enhance productivity,
For organizations heavily reliant on SharePoint Online, customizations play a crucial role in tailoring the platform to meet specific business needs. However, with Microsoft’s continuous delivery model, where updates are automatically rolled out, concerns about the impact of these updates on custom solutions are natural.
At SharePoint Designs, we understand these concerns and have developed a robust approach to ensure that your customizations remain unaffected by updates, providing you with peace of mind and uninterrupted business operations.
1. Proactive Update Management: Keeping You Ahead of the Curve
At SharePoint Designs, we meticulously monitor and manage Microsoft updates to ensure that your SharePoint environment remains stable and fully functional. We are proactive in our approach, closely tracking the Microsoft 365 Roadmap and engaging with early releases to anticipate and prepare for upcoming changes.
Our proactive update management includes:
Early Testing: We leverage the Targeted Release program to test your environment against new updates before they reach your production site. This early testing allows us to identify potential conflicts and resolve them ahead of time.
Continuous Monitoring: Our team continuously monitors Microsoft’s announcements and updates, ensuring that we are always aware of what’s coming next and how it might impact your environment.
2. Strategic Custom Development Aligned with Microsoft Best Practices
Custom development is at the heart of how SharePoint Designs helps organizations maximize the potential of SharePoint Online. We understand that the longevity and reliability of customizations depend on how well they align with Microsoft’s best practices and strategic directions.
Key aspects of our custom development approach include:
Utilizing SharePoint Framework (SPFx): We focus on developing customizations using SPFx, which is Microsoft’s recommended model for SharePoint customizations. SPFx is resilient, future-proof, and supported by Microsoft, ensuring that our solutions are robust against updates.
Following Power Platform Integration: We also integrate Power Apps and Power Automate in our custom solutions, utilizing Microsoft’s low-code/no-code tools to create flexible, scalable, and update-resistant applications.
Adherence to Microsoft’s Development Guidelines: All our custom solutions are meticulously planned and developed in strict adherence to Microsoft’s development guidelines. This alignment ensures that our customizations are built to withstand future changes in the SharePoint environment.
3. Comprehensive Governance and Testing Framework
At SharePoint Designs, we believe that governance and testing are critical to maintaining the integrity of your SharePoint environment. Our comprehensive governance framework ensures that every customization is rigorously reviewed and tested, minimizing the risk of disruption during updates.
Our governance and testing process includes:
Governance Policy: We establish and enforce a governance policy tailored to your organization, which includes guidelines for customization, change management, and regular reviews.
Sandbox Testing: All customizations are first deployed in a sandbox environment that mirrors your production site. This allows us to test the impact of updates without affecting your live environment.
Automated Testing: We employ automated testing tools to continuously monitor customizations and quickly identify any issues that might arise from new updates.
4. Ongoing Support and Continuous Improvement
Our commitment to your SharePoint environment doesn’t end with the deployment of customizations. We provide ongoing support to ensure that your solutions continue to perform optimally, even as the platform evolves.
Support and improvement services include:
24/7 Support: Our support team is available around the clock to address any concerns or issues related to your SharePoint environment, ensuring that you have assistance whenever you need it.
Regular Updates and Refactoring: We regularly revisit and refactor customizations to align with the latest Microsoft best practices and updates. This proactive approach ensures that your custom solutions remain resilient and effective.
Continuous Learning and Innovation: We stay at the forefront of Microsoft’s technological advancements, continuously learning and integrating the latest features and capabilities into your custom solutions.
Conclusion: Your Trusted Partner in SharePoint Customization
At SharePoint Designs, we understand the critical importance of maintaining the integrity of your SharePoint Online environment, especially in the face of continuous updates. By aligning our custom development with Microsoft’s best practices, leveraging modern development frameworks like SPFx, and providing comprehensive governance and support, we ensure that your customizations are not only protected but also positioned to thrive in an ever-evolving digital landscape.
Our meticulous planning and proactive approach mean that you can focus on what you do best—running your business—while we take care of ensuring your SharePoint environment remains a powerful, reliable tool for your organization. Trust SharePoint Designs to safeguard your investment in SharePoint Online, delivering custom solutions that are built to last.

How SharePoint Designs Ensures Customizations Stay Resilient Amid Microsoft SharePoint Online Updates
For organizations heavily reliant on SharePoint Online, customizations play a crucial role in tailoring the platform to meet specific business needs.
In today's digital age, businesses need robust, secure, and efficient platforms to manage their operations and data. SharePoint, a powerful tool from Microsoft, offers extensive capabilities for document management, collaboration, and workflow automation. However, maximizing the potential of SharePoint requires specialized expertise, which is where our niche SharePoint consultancy services come into play.
Why Choose Our SharePoint Consultancy Services?
1. Tailored Solutions for Your Business Needs
Every business is unique, and so are its requirements. We offer bespoke SharePoint solutions that align perfectly with your specific needs, ensuring seamless integration with your existing systems and workflows. Our consultancy services cover the entire spectrum from initial planning and deployment to ongoing support and optimization.
2. Expertise in the Latest Technologies
Staying updated with the latest advancements is crucial in the fast-evolving tech landscape. Our team of seasoned SharePoint consultants is proficient in the latest SharePoint versions and features, including SharePoint Syntex, Microsoft Viva, and Power Platform integrations. This expertise enables us to implement cutting-edge solutions that enhance productivity and collaboration.
3. Comprehensive Service Offerings
Our consultancy services encompass all aspects of SharePoint, including:
1. Architecture and Design: Crafting a robust SharePoint architecture tailored to your organizational needs.
2. Migration Services: Seamlessly migrating your data and workflows from legacy systems to SharePoint.
3. Customization and Development: Developing custom SharePoint solutions that cater to your unique business processes.
4. Training and Support: Providing comprehensive training and support to ensure your team can leverage SharePoint to its fullest potential.
4. Proven Track Record of Success
We have a proven track record of delivering successful SharePoint projects across various industries. Our client testimonials and case studies speak volumes about our commitment to excellence and customer satisfaction.
5. Focus on Security and Compliance
In an era where data breaches and compliance issues are rampant, our consultancy services prioritize security and compliance. We implement best practices and advanced security measures to protect your data and ensure regulatory compliance.
6. Enhanced Collaboration and Productivity
By leveraging the full potential of SharePoint, we help you create a collaborative work environment where teams can work together efficiently, irrespective of their location. Features like document co-authoring, version control, and automated workflows significantly boost productivity and streamline operations.
Our Unique Approach
What sets us apart from other SharePoint consultancy providers is our holistic and client-centric approach. We don't just implement solutions; we partner with you to understand your business challenges and goals, ensuring that our services add real value to your organization. Our approach includes:
1. In-depth Consultation: Conducting thorough assessments to understand your business needs and pain points.
2. Strategic Planning: Developing a comprehensive strategy that aligns with your business objectives and ensures a smooth implementation.
3. Agile Methodology: Using agile methodologies to ensure flexibility, faster delivery, and continuous improvement.
4. Post-Implementation Support: Offering ongoing support and maintenance to ensure your SharePoint environment remains optimized and up-to-date.
Case Study: Transforming Collaboration at a Leading Manufacturing Firm
One of our recent success stories involves a leading manufacturing firm struggling with disjointed communication and inefficient document management. By implementing a customized SharePoint solution, we:
1. Streamlined Document Management: Enabled centralized document storage with advanced search capabilities and version control.
2. Enhanced Collaboration: Introduced team sites and communication sites, fostering better collaboration and information sharing across departments.
3. Automated Workflows: Developed automated workflows for common processes, reducing manual effort and minimizing errors.
The result was a significant increase in productivity and a more cohesive working environment, enabling the firm to focus on its core business operations.
Conclusion
Choosing the right SharePoint consultancy service provider can be the difference between a successful digital transformation and a failed initiative. As a niche provider of SharePoint consultancy services, we bring specialized expertise, a client-focused approach, and a commitment to delivering solutions that drive real business value. Let us help you harness the power of SharePoint to transform your business operations and achieve your strategic goals.

Elevate Your Business with Specialized SharePoint Consultancy Services
In today's digital age, businesses need robust, secure, and efficient platforms to manage their operations and data. SharePoint, a powerful tool from Microsoft,
In today's fast-paced digital landscape, leveraging advanced technologies like Generative AI is becoming essential for businesses aiming to stay competitive. Microsoft Copilot Studio, a versatile AI-powered platform, is designed to transform how organizations operate by automating tasks, enhancing productivity, and providing deep insights. Below, we explore the top 10 use cases for Microsoft Copilot Studio and highlight the benefits of utilizing Generative AI in these scenarios.
1. Personalized Task Automation
Example: Automating Weekly Reports Imagine needing to send a weekly report to your manager every Friday. With Copilot Studio, you can automate this process. The tool can automatically pull the latest data, format the report, and email it to your manager.
Benefit: This automation saves time, reduces repetitive work, and ensures consistency in reporting. Employees can focus on more strategic tasks, enhancing overall productivity.
2. Enhanced Data Analysis
Example: Sales Data Dashboard You need to analyze sales data for the past year to identify trends. Copilot Studio can help you create a Power BI dashboard that updates automatically and highlights critical insights, such as top-performing products and regions.
Benefit: Quickly turning raw data into actionable insights empowers better decision-making and strategic planning, giving your business a competitive edge.
3. Intelligent Meeting Management
Example: Meeting Preparation and Summaries Before a meeting, Copilot can gather all relevant documents, create an agenda, and, after the meeting, summarize key points and action items.
Benefit: This ensures everyone is well-prepared and helps maintain a clear record of decisions and tasks, improving meeting efficiency and follow-through.
4. Content Generation and Summarization
Example: Summarizing Reports When you need to write a summary of a 20-page report, Copilot can read the report and generate a concise overview for you.
Benefit: This feature saves significant time and ensures that important information is captured accurately and consistently, facilitating better communication and understanding.
5. Customer Service Optimization
Example: AI-Powered Chatbots A customer sends an inquiry, and an AI chatbot created with Copilot Studio responds immediately, providing answers to common questions or directing the inquiry to the correct department.
Benefit: Enhances customer experience by providing immediate responses and reduces the workload on human agents, allowing them to focus on more complex issues.
6. Employee Onboarding and Training
Example: Personalized Training Programs New hires need to complete several training modules. Copilot can create a personalized training schedule and provide interactive content tailored to each new hire's role.
Benefit: Streamlines the onboarding process and ensures new employees receive the necessary training, helping them become productive faster.
7. Project Management Assistance
Example: Tracking Project Progress Managing a project with multiple deadlines and team members can be challenging. A copilot can help track progress, remind team members of upcoming tasks, and highlight potential delays.
Benefit: Keeps projects on track, ensures everyone is aware of their responsibilities, and helps in timely project completion, enhancing overall project efficiency.
8. Sales and Marketing Insights
Example: Analyzing Marketing Campaigns You want to understand the most effective marketing campaigns. Copilot can analyze customer data and campaign results to show which efforts drive the most sales.
Benefit: Helps focus marketing efforts on strategies that yield the best results, improving ROI and marketing efficiency.
9. Compliance and Risk Management
Example: Monitoring Regulatory Compliance Your company needs to comply with new regulations. Copilot can monitor your processes, automatically generate compliance reports, and alert you to potential issues.
Benefit: Ensures your company stays compliant with less manual effort, reducing the risk of penalties and enhancing overall governance.
10. Enhanced Collaboration Tools
Example: Collaborative Document Editing Your team is working on a shared document. Copilot can suggest edits, track changes, and help schedule collaboration sessions in Teams.
Benefit: Facilitates seamless collaboration, even among remote teams, ensuring everyone stays on the same page and improving the quality of collaborative work.
Benefits of Utilizing Generative AI with Microsoft Copilot Studio
1. Increased Efficiency
Generative AI can handle repetitive tasks, allowing employees to focus on more strategic activities. This increases overall efficiency and productivity.
2. Improved Decision-Making
By analyzing large datasets and generating insights, Generative AI supports better decision-making. It helps businesses identify trends, opportunities, and potential risks quickly.
3. Enhanced Customer Experience
AI-powered tools can provide immediate responses and personalized interactions, significantly improving customer satisfaction and loyalty.
4. Cost Savings
Automating tasks reduces the need for manual labor, leading to cost savings. Additionally, AI-driven insights can help optimize resource allocation and reduce waste.
5. Scalability
Generative AI solutions can scale quickly to meet the growing demands of the business. Whether handling more data, more users, or complex tasks, AI can adapt and grow with the organization.
Conclusion
Microsoft Copilot Studio, powered by Generative AI, offers a multitude of use cases that can transform how businesses operate. The benefits are clear, from automating routine tasks to providing deep data insights. By leveraging these capabilities, organizations can enhance productivity, improve decision-making, and deliver superior customer experiences. As we navigate the digital age, embracing tools like Microsoft Copilot Studio will be crucial for maintaining a competitive edge and achieving sustained success.

Top 10 Use Cases for Microsoft Copilot Studio: Harnessing the Power of Generative AI
In today's fast-paced digital landscape, leveraging advanced technologies like Generative AI is becoming essential for businesses aiming to stay competitive.
In today's fast-paced digital landscape, businesses need robust, efficient, and user-friendly platforms to stay competitive. Microsoft Power Pages, part of the powerful Power Platform suite, offers an incredible opportunity to create secure, low-code business websites tailored to a variety of use cases. This blog post explores how Power Pages can revolutionize your operations across different sectors, providing strategic insights into their practical applications.
1. Customer Self-Service Portals
Description: Empower your customers to manage their accounts, track orders, and access support independently.
Benefits: By reducing the workload on customer service teams, these portals provide 24/7 access to crucial customer information, enhancing overall satisfaction and loyalty.
Example: Imagine an e-commerce business where customers can log in to track their shipments, view their order history, and initiate returns effortlessly. Power Pages enables the creation of a seamless self-service experience that meets these needs.
2. Partner Portals
Description: Foster collaboration with business partners by sharing essential documents, project updates, and sales data in real time.
Benefits: Some advantages are enhanced partner relationships, improved communication, and streamlined business processes.
Example: A manufacturing company can leverage Power Pages to provide its distributors with a centralized portal for accessing product catalogs, pricing information, and order statuses, ensuring that all parties are on the same page.
3. Employee Onboarding Portals
Description: Simplify the onboarding process by providing new hires access to necessary resources, training materials, and company information.
Benefits: Reduce onboarding time, enhance the new hire experience, and ensure compliance with company policies, all through a streamlined, user-friendly portal.
Example: A tech company can use Power Pages to create an onboarding portal where new employees can complete required paperwork, access training modules, and learn about the company culture, making their transition smoother and more efficient.
4. Community Portals
Description: Engage with community members by providing information, events, and support services tailored to their needs.
Benefits: Build a sense of community, provide easy access to critical information, and support local initiatives effectively.
Example: Local governments can utilize Power Pages to create a community portal where residents can find information about local events, public services, and contact officials, fostering a stronger, more connected community.
5. Supplier Portals
Description: Streamline procurement processes by allowing suppliers to submit bids, track orders, and manage invoices.
Benefits: Increase transparency, reduce administrative tasks, and expedite the procurement cycle, benefiting both the business and its suppliers.
Example: A retail chain can manage its supplier relationships more efficiently by providing a portal for suppliers to submit bids, track purchase orders, and manage invoices, all in one place.
6. Training and Certification Portals
Description: Offer online training courses, certification programs, and learning resources to employees or members.
Benefits: Facilitate employee development, ensure compliance with industry standards, and support continuous learning initiatives.
Example: Professional associations can offer members a portal to access certification programs, register for courses, and track their learning progress, helping them stay competitive and knowledgeable in their fields.
7. Event Management Portals
Description: Manage event registrations, schedules, and communications for conferences, seminars, and workshops.
Benefits: Simplify event planning, improve attendee experience, and provide real-time updates to ensure everything runs smoothly.
Example: Event management companies can use Power Pages to create a comprehensive portal for attendees to register, view event schedules, and receive timely updates, enhancing the overall event experience.
8. Project Management Portals
Description: Share project plans, timelines, and status updates with stakeholders, ensuring transparency and collaboration.
Benefits: Enhance project visibility, improve collaboration, and ensure timely updates to keep projects on track.
Example: Construction firms can provide clients with a portal to track the progress of building projects, view milestones, and access project documents, ensuring that everyone involved is well-informed and aligned.
9. Patient Portals
Description: Provide patients with secure access to their health records, appointment scheduling, and direct communication with healthcare providers.
Benefits: Improve patient engagement, streamline administrative processes, and enhance the quality of care by making health information easily accessible to patients.
Example: A healthcare provider can implement a patient portal that allows patients to view test results, schedule appointments, and communicate with their doctors, fostering better patient-provider relationships and more efficient care management.
10. Membership Management Portals
Description: Manage memberships, renewals, and exclusive member content for clubs, associations, or fitness centers.
Benefits: Simplify membership management, increase member engagement, and provide a centralized platform for accessing member-exclusive resources and benefits.
Example: A fitness center can create a portal where members can manage their subscriptions, book classes, and access exclusive content like workout videos and nutritional advice, enhancing the overall member experience.
Conclusion
Power Pages offers a versatile and robust solution for businesses looking to enhance their digital presence and streamline various operations. Organizations can improve efficiency, foster collaboration, and provide exceptional user experiences by leveraging these portals. Whether you’re managing customer relationships, onboarding new employees, or coordinating with partners and suppliers, Power Pages can be tailored to meet your unique business needs.

Transform Your Business with Power Pages: Versatile Use Cases Across Industries
In today's fast-paced digital landscape, businesses need robust, efficient, and user-friendly platforms to stay competitive.
Let's explore the science behind the Magic of Visuals!
Recently I was reading a book on Cognitive Psychology, which deals with how information is perceived, processed, and stored in the human brain. I was amazed to discover how several concepts of Psychology are utilized in Design, even without realizing it.
In cognitive science and psychology, the adage "A picture is worth a thousand words" reflects the idea that images can convey complex information more efficiently and effectively than text alone. This concept is supported by how our brains process visual information.
Understanding the Science
Visual Processing:
Our brains are highly tuned to process visual information quickly. When we see an image, our brain can immediately recognize patterns, colours, shapes, and scenes, which helps us understand the context and meaning without needing to read or hear a detailed explanation.
Memory
Visuals are often easier to remember than text. This is known as the "picture superiority effect." When you see an image, your brain stores it as both an image and a word, making it easier to recall later.
Comprehension
Images can simplify complex ideas. They can break down information into easily digestible visual chunks, making it simpler to understand and absorb, whereas words take more time and effort to read and comprehend.
Example 1: Traffic Signs
A stop sign immediately conveys the need to stop without any text. Drivers instantly recognize the sign and understand its meaning. Here are some of the road signs that drivers can easily understand without any need for additional text.

Example 2: Icons and Symbols
Icons and symbols can convey messages quickly and universally, transcending language barriers.
Example 3: Graphs and Charts
Graphs and charts can present data in a visually appealing way, making it easier to compare and analyze information at a glance.

Example 4: Infographics
Infographics use striking, engaging visuals to communicate information quickly and clearly. E.g. In the case of COVID-19 safety measures, an infographic can visually represent these safety measures, making it easier for people to understand and remember the guidelines.

Example 5: Emotions
A happy face emoji can instantly convey the emotion of happiness, which might take several words to describe. Here are some of the emojis that most of us can easily understand without any need for further explanation.

Summary
The adage "a picture is worth a thousand words" underscores the power of visual communication. Our brains are wired to process, remember, and understand visual information quickly and efficiently. Images can convey complex ideas, emotions, and instructions in a way that is more immediate and impactful than text alone.
In Conclusion, yes, a picture is indeed worth a thousand words!

Is a Picture worth a Thousand words?
Recently I was reading a book on Cognitive Psychology, which deals with how information is perceived, processed, and stored in the human brain.

In today's digital landscape, seamless authentication processes are paramount for ensuring user convenience and security. One effective solution is integrating Azure Active Directory (Azure AD) with Power Pages, Microsoft's dynamic content management system. By doing so, you can enhance user experience and simplify access management. In this guide, we'll walk through the step-by-step process of configuring Azure AD integration on Power Pages, enabling users to sign in securely from the home page.
Configuring Azure AD Integration on Power Pages
Accessing Power Pages Management
- Open your Power Pages site and navigate to the management section by clicking on the three dots and selecting "Power Pages Management".

Navigating to Site Settings
- Under the website section, locate and click on "Site Settings".

Configuring Authentication Type:
- Search for "LoginButtonAuthenticationType" and click on it.

- In the value field, enter"https://login.windows.net/[tenantid]/", replacing [tenantid] with your specific tenant ID.

Saving Changes:
- Click on "Save and Close" to ensure the configuration is applied.
Syncing and Previewing Changes
- Sync the changes made to ensure they take effect.
Preview the Power Pages site to confirm that the Azure AD integration is functioning as expected.
Streamlining Authentication with Azure AD Integration on Power Pages
In today's digital landscape, seamless authentication processes are paramount for ensuring user convenience and security.

When working with Power Automate and SharePoint, managing time zones can be a complex task. Whether you're scheduling tasks, automating workflows, or simply trying to display the correct time on a SharePoint list, handling time zones correctly is crucial for ensuring your data is accurate and your workflows run smoothly. In this blog, we'll explore common challenges and provide step-by-step solutions to effectively manage time zones in Power Automate.
Understanding the Time Zone Challenge
SharePoint stores date and time values in Coordinated Universal Time (UTC). While this is great for consistency, it can cause issues when users in different time zones access the data. For example, a task due at 5 PM UTC will display differently for users in New York, London, and Tokyo. Power Automate, being a versatile tool, provides sever always to handle these discrepancies.
Step-by-Step Guide to Handling Time Zones in Power Automate
Step 1: Capture the Time Zone
First, it's essential to capture the user's time zone. This can be done in various ways, such as setting Regional Settings from Site Administration in Site Settings.
1. Create a SharePoint Site & List for Time Zones:
- Create a new Site called "SPDDEMO."
- Create a new list in SharePoint called "TimeZone."
- Add columns for "User" (Person or Group) , "SatartDateAndTime" (Date Picker), "EndDateAndTime" (Date Picker).
2. Set the TimeZone:
- Settings > Site Information > View all site settings > Site Administration > Regional Settings
- Set the Time zone & Region accordingly you want.
Step 2: Retrieve the Time Zone in Power Automate
Use Power Automate to retrieve the user's time zone when the workflow runs.
1. Get List Item:
- Add a "Get items" action to retrieve the user's time zone from the "TimeZone" list.

- Add a "Send Http request to SharePoint" action to retrieve the regional time zone from the " SPDDEMO " site.
- Add method GET and Uri as _api/web/regionalSettings/Timezone
2. Get Time Zone:

3. Simplify the output using Parse JSON
- Pass the above output Body through Parse JSON to get simplify output.

4. Change the sign of Bias:
- Use one compose and called “Compose SPDDEMOBias”.
- To Change the Bias received from the Parse JSON multiply it with -1(Minus one)
- Use function: mul(body('Parse_JSON_SPDDEMO_Regional_Time_Setting')?['d']?['Information']?['Bias'],-1)

Step 3: Convert UTC to the User's Time Zone
Convert the UTC time to the user's time zone in Power Automate using simple add Minutes function and Bias.
1. Add a Compose Action:
- Add addMinutes function and the Bias as to be added minutes and then format ‘M/dd/yyyy h:mm tt’ to the get list items in “TimeZone” list like “StartDateAndTime” , “EndDateAndTime”,” Created”, “Modified” etc.
- Use function: addMinutes(outputs('Get_item_SPDDEMO')?['body/Created'],outputs('Compose_SPDDEMO_Bias'),'M/dd/yyyy h:mm tt')


Navigating Time Zones in Power Automate with SharePoint: A Comprehensive Super Change Guide
When working with Power Automate and SharePoint, managing time zones can be a complex task. Whether you're scheduling tasks, automating workflows,
In today's digital age, organizations are continually seeking ways to streamline operations, enhance productivity, and improve user experiences. Leveraging artificial intelligence (AI) to enhance SharePoint forms and workflows presents a strategic opportunity to achieve these objectives. By integrating AI capabilities, businesses can automate repetitive tasks, enhance data accuracy, and gain predictive insights, there by transforming how they operate.
This blog will delve into the power of AI in SharePoint, explore practical applications across various business scenarios, and provide detailed examples of AI-enhanced workflows. We will cover the following sections:
1. The Power of AI in SharePoint
Artificial intelligence is revolutionizing how organizations handle data and automate processes. In SharePoint, AI can be used to create smarter forms and workflows that streamline various business processes. AI capabilities, such as natural language processing (NLP), machine learning, and cognitive services, can be integrated into SharePoint through tools like Microsoft Power Automate and Azure AI.
By embedding AI into SharePoint, organizations can achieve:
- Automated Data Processing: AI can automate the extraction, classification, and validation of data, reducing manual efforts and increasing accuracy.
- Predictive Analytics: AI models can analyze historical data to provide predictive insights, helping businesses make informed decisions.
- Enhanced User Experience: AI-powered features like natural language input and intelligent recommendations make forms easier to complete and more intuitive.
2. Leveraging Microsoft Power Automate
Microsoft Power Automate is a powerful tool that allows users to automate workflows between various apps and services. It enables the synchronization of files, the collection of data, and the automation of notifications. By incorporating AI ,Power Automate can significantly enhance these workflows.
Copilot-Assisted Automation
Power Automate’s Copilot feature leverages AI to assist in creating and managing workflows using natural language inputs. This capability allows users to build complex automation processes without extensive coding knowledge. For instance, users can describe the desired workflow in natural language, and Copilot will generate the necessary automation steps.
Intelligent Document Processing
AI Builder, a feature within Power Automate, enables the integration of AI models into workflows. It can be used to process documents, extract data, classify information, and even translate content. This is particularly useful for automating tasks like invoice processing, contract management, and customer support.
3. Enhancing SharePoint Forms with AI
Integrating AI into SharePoint forms can enhance their functionality and user experience. Here are a few ways to do this:
AI-Powered Search and Recommendation
AI models can enhance search capabilities within SharePoint forms. For example, Azure Machine Learning can be used to build a recommendation engine that suggests relevant documents or data based on user input. This can help users quickly find the information they need.
Natural Language Processing (NLP)
NLP capabilities can be integrated into SharePoint forms to allow users to interact with them using natural language. This can improve the user experience by making forms easier and faster to fill out. For instance, users can describe their needs in natural language, and the form will auto-fill the appropriate fields.
4. Using Azure AI Services
Azure AI offers a comprehensive suite of tools that can be integrated into SharePoint for advanced AI functionalities. These services include Azure AI Studio, Azure Cognitive Services, and more.
Azure AI Studio
Azure AI Studio is a unified platform for developing generative AI solutions. It can be used to create AI models that provide real-time insights and analytics, which can be embedded into SharePoint forms and workflows. This helps organizations leverage their data to gain actionable insights.
Azure Cognitive Services
Azure Cognitive Services provides a range of AI capabilities, including speech-to-text, text-to-speech, language understanding, and more. These services can be integrated into SharePoint to enhance form interactions and automate data processing. For example, speech-to-text can be used to transcribe audio inputs into text fields within forms.
5. Integrating Azure Open AI Studio
Azure OpenAI Studio brings the power of advanced generative AI models like GPT-4 to SharePoint, enabling new capabilities that were previously unimaginable. By integrating Azure OpenAI Studio, organizations can create highly intelligent and interactive forms and workflows.
Generative AI for Enhanced User Interaction
With Azure Open AI Studio, you can develop generative AI models that understand and generate human-like text. This capability can be used to create more interactive and intuitive SharePoint forms. For instance, forms can auto-generate responses based on user inputs, provide detailed explanations, and even offer suggestions for completing tasks.
Advanced Analytics and Insights
Azure OpenAI Studio can be used to analyze large datasets and generate insights that can be embedded into SharePoint workflows. For example, a generative AI model can analyze customer feedback data and provide a summary of key trends and sentiments, helping businesses make data-driven decisions.
Automating Complex Workflows
Generative AI models from Azure OpenAI Studio can automate complex workflows by understanding context and making decisions based on patterns in the data. This can significantly reduce the time and effort required to manage workflows and improve overall efficiency.
6. Leveraging Microsoft Copilot Studio
Microsoft Copilot Studio is designed to help organizations harness the power of AI to transform their business processes. It allows users to create custom AI models that integrate seamlessly with Microsoft 365 and other Microsoft tools.
Personalized AI Models
Copilot Studio enables the creation of personalized AI models that can be tailored to specific business needs. These models can understand and process natural language, making it easier to automate tasks and improve efficiency.
Enhancing Collaboration
Copilot Studio can enhance collaboration by providing AI-driven insights and recommendations within Microsoft Teams and other collaboration tools. This helps teams stay aligned and make better decisions.
Streamlining Processes
With Copilot Studio, organizations can streamline processes by automating repetitive tasks and providing AI-driven support for complex workflows. This reduces the workload on employees and allows them to focus on higher-value activities.
7. Practical Applications and Detailed Examples
Here are detailed examples of how AI can enhance SharePoint forms and workflows across various business scenarios:
Example 1: Expense Report Automation
Scenario: Employees submit expense reports through a SharePoint form.
AI Enhancements
Receipt Scanning: Use Azure Cognitive Services to automatically scan and extract data from uploaded receipts.
Expense Categorization: AI models classify expenses into categories (e.g., travel, meals, accommodation)based on the extracted data.
Policy Compliance Check: An AI engine checks the submitted expenses against company policies and flags any discrepancies.
Workflow
- Employee submits an expense report with receipts.
- AI extracts and categorizes expense data using Azure Cognitive Services.
- Power Automate triggers a workflow that routes the report to the finance team for review.
- AI checks for policy compliance and notifies the employee and finance team of any issues.
- Approved expenses are automatically recorded in the financial system.
Enhanced with Copilot Studio
- Personalized AI models in Copilot Studio can provide tailored recommendations for expense categorization based on historical data.
- Copilot can offer insights into spending patterns and suggest cost-saving measures.
Enhanced with Azure OpenAI Studio
- Generative AI models can provide detailed explanations and guidance on submitting accurate expense reports.
- OpenAI can automate the review process by generating summaries and insights for finance team approval.
Example 2: Customer Feedback Analysis
Scenario: Collecting customer feedback through SharePoint forms.
AI Enhancements
Sentiment Analysis: Use Azure Cognitive Services to analyze the sentiment of customer feedback.
Keyword Extraction: AI extracts key themes and topics from feedback.
Trend Analysis: Machine learning models identify trends over time to inform business decisions.
Workflow
- Customer submits feedback through a SharePoint form.
- AI performs sentiment analysis and keyword extraction using Azure Cognitive Services.
- Power Automate triggers a workflow to categorize feedback based on sentiment and keywords.
- Feedback trends are analyzed and visualized in Power BI dashboards.
- Automated alerts are sent to relevant teams if negative trends are detected.
Enhanced with Copilot Studio
- Copilot can provide real-time recommendations for responding to customer feedback.
- Personalized AI models can suggest improvements based on historical feedback data.
Enhanced with Azure OpenAI Studio
- Generative AI models can generate detailed summaries of feedback trends and provide actionable insights.
- OpenAI can automate the creation of customer response templates based on the sentiment and content of feedback.
Example 3: Employee Performance Review
Scenario: Managing employee performance reviews using SharePoint forms.
AI Enhancements
Goal Tracking: AI tracks progress on individual and team goals.
Performance Prediction: Machine learning models predict future performance based on historical data.
Personalized Recommendations: AI provides personalized training and development recommendations based on performance data.
Workflow
- Manager and employee complete performance review forms in SharePoint.
- AI tracks progress on goals and provides a summary of achievements.
- Machine learning models predict future performance and identify areas for improvement.
- Power Automate triggers a workflow to schedule follow-up meetings and training sessions.
- Personalized training recommendations are sent to the employee and manager.
Enhanced with Copilot Studio
- Copilot can provide personalized coaching tips and development plans based on individual performance data.
- AI models can generate insights into team dynamics and suggest ways to improve collaboration.
Enhanced with Azure OpenAI Studio
- Generative AI models can create detailed performance reports and highlight key achievements.
- OpenAI can provide predictive insights into future performance trends and potential areas of improvement.
Example 4: Inventory Management
Scenario: Automating inventory management processes with SharePoint forms.
AI Enhancements
Demand Forecasting: AI models predict future inventory needs based on historical sales data.
Stock Level Alerts: AI monitors stock levels and sends alerts when inventory is low.
Supplier Recommendations: Machine learning algorithms recommend suppliers based on price, delivery time, and past performance.
Workflow
- Employee submits inventory update through a SharePoint form.
- AI forecasts future demand and adjusts inventory levels accordingly.
- Power Automate triggers a workflow tore order stock when levels are low.
- AI recommends suppliers and generates purchase orders.
- Automated notifications are sent to relevant departments.
Enhanced with Copilot Studio
- Copilot can provide real-time insights into inventory trends and recommend optimal ordering times.
- Personalized AI models can predict seasonal demand fluctuations and suggest adjustments.
Enhanced with Azure OpenAI Studio
- Generative AI models can automate the creation of detailed inventory reports and supplier evaluations.
- OpenAI can generate predictive insights into potential supply chain disruptions and suggest contingency plans.
Example 5: Incident Reporting and Resolution
Scenario: Managing incident reports and resolutions in the workplace.
AI Enhancements
Incident Classification: AI classifies incidents based on type and severity.
Resolution Recommendations: Machine learning models provide recommendations for resolving incidents based on past cases.
Automated Follow-Up: AI ensures follow-up actions are taken and tracks resolution progress.
Workflow
- Employee submits an incident report through a SharePoint form.
- AI classifies the incident and assigns a severity level using Azure Cognitive Services.
- Power Automate triggers a workflow to notify the relevant response team.
- AI provides resolution recommendations and tracks progress.
- Automated follow-up actions are scheduled and tracked until the incident is resolved.
Enhanced with Copilot Studio
- Copilot can provide real-time guidance on best practices for incident resolution.
- Personalized AI models can predict the impact of incidents on operations and suggest mitigation strategies.
Enhanced with Azure OpenAI Studio
- Generative AI models can create detailed incident reports and suggest preventive measures.
- OpenAI can automate the generation of follow-up action plans and monitor their implementation.
8. Benefits of AI-Enabled SharePoint Solutions
Integrating AI into SharePoint forms and workflows offers numerous benefits:
Increased Efficiency
By automating repetitive tasks, AI reduces the time required to process forms and handle workflows. This allows employees to focus on higher-value tasks, improving overall productivity.
Enhanced Accuracy
AI models improve data accuracy by validating and cross-referencing information in real-time. This reduces errors and ensures that data is consistent and reliable.
Better User Experience
Natural language inputs and intelligent recommendations make forms easier and faster to fill out. This enhances the user experience and increases user satisfaction.
Proactive Decision-Making
AI-powered predictive analytics provide insights that help businesses make proactive decisions. This enables organizations to anticipate issues and opportunities, leading to better business outcomes.
Cost Savings
Automating processes with AI reduces the need for manual intervention, leading to cost savings. Additionally, AI-driven insights can help optimize resource allocation and reduce operational costs.
Conclusion
Integrating AI into SharePoint forms and workflows is a transformative strategy that can significantly enhance business processes. By leveraging tools like Power Automate, Azure AI, Azure OpenAI Studio, Microsoft Copilot Studio, and AI Builder, organizations can create intelligent, responsive, and efficient systems that adapt to their evolving needs.
Whether it’s automating expense reports, analyzing customer feedback, managing performance reviews, handling inventory, or resolving incidents, AI-enabled SharePoint solutions offer a wide range of benefits that drive productivity, accuracy, and user satisfaction.
For organizations looking to stay competitive in today’s digital landscape, investing in AI-enhanced SharePoint forms and workflows is a crucial step toward achieving operational excellence and business success. Explore the comprehensive resources available on Microsoft's official site and stay updated with the latest advancements in AI and the Power Platform to unlock the full potential of your SharePoint environment.

Transforming Business Processes with AI-Enabled SharePoint Forms and Workflows
In today's digital age, organizations are continually seeking ways to streamline operations, enhance productivity, and improve user experiences.
Managing API permissions in SharePoint can be a crucial task for maintaining the security and functionality of your organization's digital environment. If you're a Global Admin, you can grant these permissions with ease by following the steps outlined below.
Prerequisite: Global Admin Role
Before you begin, ensure that you have the Global Admin role. This role is necessary to access and modify API permissions in the SharePoint Admin Center.
Benefits of granting API Access
Granting API access in SharePoint Online unlocks powerful features for custom webpart development. By leveraging APIs, you can build webparts that extend SharePoint's functionality beyond its core features.
Eg: Fetching User Details.
Step 1: Access SharePoint Admin Center
First, navigate to the SharePoint Admin Center. You can do this by going to the following
URL: https://<your-tenant-name>-admin.sharepoint.com/_layouts/15/online/AdminHome.aspx#/webApiPermissionManagement
Replace <your-tenant-name> with the actual name of your tenant. This link will take you directly to the Web API Permission Management section within the SharePoint Admin Center

Step 2: Approve API Requests
Once you're in the SharePoint Admin Center, follow these steps to approve API requests:
Click on "Pending Requests”: Locate and click on the "Pending Requests" section. This will display all the API requests that are awaiting approval.
Review Pending API Requests: Look through the list of pending API requests permissions type. These requests come from external applications (Such as Custom Webpart development) that are seeking permission to access your SharePoint data.

Select the API: Find the API in the list of pending requests.
Click "Approve": After selecting the API, click the "Approve" button to grant the necessary permissions.

By following these steps, you can easily manage and approve API permissions in SharePoint. This ensures that only trusted applications have access to your SharePoint environment, maintaining both security and functionality.
Conclusion
Granting API permissions in SharePoint is a straightforward process when you have the Global Admin role. By navigating to the SharePoint Admin Center and approving pending requests, you can control which external applications interact with your SharePoint data. Always review requests carefully to ensure they are legitimate and necessary for your organization’s needs.

How to grant API permissions in sharepoint admin?
Managing API permissions in SharePoint can be a crucial task for maintaining the security and functionality of your organization's digital environment.
What is PowerApps and How Can It Benefit Your Business?
Feeling overwhelmed by repetitive tasks? Struggling with outdated systems that are slowing down your workflow? In today's fast-paced business environment, streamlining workflows and boosting productivity is crucial for success. This is where PowerApps comes in.
PowerApps is a powerful low-code development platform from Microsoft. It helps you to develop customized business applications without requiring a deep understanding of coding. Think of it as a user-friendly tool that allows you to build solutions specifically tailored to your unique needs.
Here are just a few key benefits of using PowerApps
- Increased Efficiency: Automate repetitive tasks and manual processes, freeing up valuable time for your team to focus on higher-level work.
- Improved Productivity: Streamline workflows and provide employees with the tools they need to get things done faster and more efficiently.
- Enhanced Collaboration: Facilitate teamwork and information sharing through collaborative applications that connect your workforce.
- Reduced Costs: Save time and money by building custom solutions in-house, instead of relying on expensive traditional development or third-party software.
- Scalability and Flexibility: PowerApps applications can grow and adapt alongside your business needs, ensuring your tools continue to support your evolving workflows.
Top 10 PowerApps Templates to Streamline Your Workflow
Now that you understand the power of PowerApps, let's explore some of the most valuable pre-built templates available. These Free PowerApps Templates offer a great starting point to address common business challenges and can be easily customized to fit your specific needs.
1. Expense Tracker
Say goodbye to paper receipts and manual expense reports! This user-friendly template allows employees to easily capture and submit expense details on the go, with automatic calculations and clear categorization. Managers can review and approve submissions within the app, saving everyone time and frustration.
2. Inventory Management
Never run out of stock again! This template provides real-time insights into your inventory levels. Track product details, quantities, and reorder points, all within a centralized and accessible platform. Generate reports to identify trends and optimize your ordering process for maximum efficiency.
3. Leave Request and Approval
Streamline your leave request process with this intuitive template. Employees can submit requests with clear details and justifications, while managers can review and approve or deny leave electronically. Automated notifications keep everyone informed throughout the process, eliminating the need for email back-and-forth.
4. Customer Relationship Management (CRM)
Build stronger customer relationships with a custom CRM template. Track customer interactions, manage leads, and oversee sales pipelines, all within a user-friendly interface. This template allows you to centralize customer data, personalize interactions, and improve overall customer satisfaction.
5. Survey and Feedback
Capture valuable insights from employees, customers, or stakeholders with a customizable survey template. Design surveys with various question formats, gather real-time data, and analyze results visually. Utilize this feedback to improve processes, identify areas for improvement, and gain a deeper understanding of your target audience.
6. Asset Management
Keep track of your company assets with this comprehensive template. Log asset details, track maintenance schedules, and monitor locations, all within a central platform. This streamlines asset management, reduces loss, and ensures preventative maintenance is performed on time.

Supercharge Your Workflow: Top 10 PowerApps Templates and How They Benefit Your Business
Feeling overwhelmed by repetitive tasks? Struggling without dated systems that are slowing down your workflow? In today's fast-paced business environment,

1. Delight Your Users
Small, delightful experiences can greatly influence how users perceive your product. These moments are not about functionality; they are about adding fun, lifting spirits, and inspiring joy.
Consider ways to evoke emotions in your users, aiming to create enjoyable and memorable moments.
Key Benefits:
- Increased Engagement: Positive experiences create feedback loops that encourage users to return.
- Organic Growth: Delightful interactions are more likely to be shared, naturally extending your reach through word of mouth—the most powerful form of marketing.
- User Happiness: Boosts overall satisfaction and fosters a deeper emotional connection with your product.

2. Make the Effort Visible
Revealing the hard work behind your service enhances its perceived value. When users seethe effort put into creating a product, their appreciation grows.
Key Benefits:
- Higher Conversions: Highlighting your dedication can improve conversion rates.
- Greater Trust: Users are more likely to trust and value your service when they recognize the effort behind it.

3. Use Faces
Using human faces in your design can attract attention and evoke empathy.
- Guide Attention: Faces looking towards CTAs or key content can effectively direct user focus.
- Stay Authentic: Choose real, relatable photos to maintain authenticity.
- Evoke Emotion: Select faces that reflect the emotions you want users to feel.
Key Benefits:
- Increased Engagement: Faces build personal connections with users.
- Enhanced Trust: Authentic visuals humanize your product and build trust.
%201.avif)

The directional gaze image emerged as the clear winner, revealing the powerful impact of guiding viewer attention with simple visual cues.

7 Design Approaches to Build Stronger Emotional Engagement
Small, delightful experiences can greatly influence how users perceive your product. These moments are not about functionality; they are about adding fun, lifting spirits, and inspiring joy.

In an age where digital interactions define user experiences, creating a strong first impression in UI/UX design is critical. As a seasoned designer with over 6 years of experience and numerous successful projects under my belt, I understand that users, much like judges, form opinions within seconds. Implementing design strategies that resonate with human judgment not only captivates users but establishes trust and credibility from the get-go.

Summary
This article presents four ways to craft a strong first impression in UI/UX: use clean, visually appealing layouts; engage users with interactive, personalized touches; make interactions effortless through consistency, smart defaults, and clear error handling; and prioritize action with continuous feedback, collaboration, and testing. The focus is on clarity, convenience, and empathy so users feel understood, confident, and in control from the first interaction.
1. Looks Matter
Just like we notice someone's appearance, the visual appeal of a digital interface is crucial. A clean and uncluttered design, like the below website, should grab attention and make it easy for users to find what they need.
By keeping things neat and focusing on what's needed, designers make users feel comfortable and in control.
Research shows that users make judgments about a website's aesthetic within 0.05 seconds. A clean, uncluttered design allows users to navigate easily and discover content efficiently. Consider brands like Notable Brand that have redefined their interfaces to prioritize clarity


4 Tips for making a Great First Impression in Design
In an age where digital interactions define user experiences, creating a strong first impression in UI/UX design is critical.
Modern design is crucial in today's digital environment, and this is especially true for SharePoint intranets. The design of these digital hubs is critical to user engagement and productivity enhancement. They are the cornerstone of internal collaboration and interaction within enterprises.
When it comes to intranet platforms, SharePoint is a global leader because it provides unmatched scalability, flexibility, and integration possibilities. Because of its many capabilities and easy interaction with third-party apps and Microsoft 365, it is the platform of choice for companies all around the world.
Why Modern Design Matters for SharePoint Intranets
A modern SharePoint intranet is more than just a place to keep files and documents. It's an interactive platform that promotes information accessibility and user engagement. This is how your intranet will benefit from a modern design approach:
1. Elevate User Experience (UX)
Empower users to swiftly and efficiently access the resources they need through an intuitive interface and seamless navigation.
2. Boost Employee Engagement
A visually captivating and user-friendly intranet design encourages user adoption, fostering a sense of excitement with modern layouts and captivating imagery..
3. Maximize Productivity
Streamlined workflows and an intuitive information architecture empower employees to focus on their core responsibilities by simplifying the resource search process.
4. Foster Collaboration
Modern design elements inspire employee interaction and the exchange of knowledge, promoting a strong sense of community within the organization.
Explore Modern SharePoint Intranet Examples for 2024
Modern design is crucial in today's digital environment, and this is especially true for SharePoint intranets.
In the rapidly evolving digital landscape, organizations continuously seek tools that enhance efficiency and streamline operations. A pivotal development in this quest is the general availability of SharePoint eSignatures, slated for release in 2024. This feature marks a significant advancement in Microsoft's document management capabilities, integrating seamlessly with Microsoft Syntex to enhance user experience and security.
1. Streamlined Document Handling
SharePoint eSignatures revolutionize how businesses handle contracts and agreements by enabling digital signing directly within the SharePoint environment. This integration eliminates the need for third-party eSignature solutions, reducing costs and complexity while ensuring data remains secure within the Microsoft ecosystem.


Embracing Digital Transformation: SharePoint eSignatures Available in 2024
In the rapidly evolving digital landscape, organizations continuously seek tools that enhance efficiency and streamline operations.
Introduction
In today's digital-first environment, organizations are continuously searching for ways to streamline processes and enhance productivity. SharePoint Syntex, part of the Microsoft 365 suite, leverages artificial intelligence to transform the way your business manages and utilizes content. This blog post outlines a practical roadmap for IT leaders looking to deploy SharePoint Syntex effectively.
1. Assessment and Planning
Kickstart your journey by identifying which business processes could benefit most from AI insights. SharePoint Syntex excels in automating data extraction and enhancing document management. Begin with mapping the location and structure of content across SharePoint libraries or other data repositories, pinpointing where Syntex can deliver the most impact.
2. Configuration and Setup
Ensure your organization is equipped with the necessary SharePoint Syntex licenses. Setting up your SharePoint environment to integrate Syntex involves configuring SharePoint sites and connecting essential data sources, laying the foundational framework for sophisticated data handling.
3. Model Training
Central to SharePoint Syntex’s functionality is its AI-driven model training:
- Create a Content Center: Designate a space in SharePoint where models are trained and managed.
- Develop Models: Depending on your needs, train document understanding models for structured or unstructured documents, or form processing models for automated data extraction.
4. Applying Models
Deploy your trained models to automatically classify and extract information from documents in specified libraries or repositories. This step is crucial for converting raw data into actionable insights.

Unleashing Efficiency: Your Step-by-Step Guide to Implementing SharePoint Syntex
In today's digital-first environment, organizations are continuously searching for ways to streamline processes and enhance productivity.
Most organizations know SharePoint as a place to store files. But the businesses that get real value from it use SharePoint very differently.
They use it to:
- Reduce email overload
- Centralize knowledge
- Automate everyday processes
- Support hybrid and remote work
- Create a single digital workplace employees actually rely on
This article explains what SharePoint is, and more importantly, how it helps businesses improve collaboration, productivity, and information management in real-world scenarios.
What is SharePoint?
SharePoint is a web-based platform from Microsoft that helps organizations store, manage, share, and collaborate on information securely.
Over time, it has evolved from a basic file-sharing tool into a full digital workplace platform that supports:
- Intranets and internal portals
- Document management with version control
- Team and department sites
- Workflow automation
- Integration with Microsoft 365 tools
Today, SharePoint acts as a central layer that connects people, content, and processes across the organization.
Why Businesses Use SharePoint (Beyond File Storage)
The real value of SharePoint lies in how it brings structure to everyday work.
Instead of scattered files, emails, and disconnected tools, SharePoint provides a single source of truth where teams can collaborate with clarity and control.
This combination makes SharePoint especially valuable for growing and distributed teams.
How SharePoint Improves Everyday Workflows
In many organizations, work slows down because information lives in too many places.
SharePoint simplifies this by bringing documents, discussions, and processes together.
Practical workflow improvements include:
- Teams collaborating on the same document without email attachments.
- Automated approval flows replacing manual follow-ups.
- Department sites replacing shared drives.
- Clear ownership and visibility over content.
When structured properly, SharePoint reduces friction rather than adding another tool to manage.

What is SharePoint? A Complete Guide to How it Helps Businesses Work Smarter.
Most organizations know SharePoint as a place to store files. But the businesses that get real value from it use SharePoint very differently.
TL;DR
The simple answer is Yes and No. If you use a prompt into ChatGPT to generate a result, you cannot claim copyright protection for the output. On the bright side, if you modify the output in creative ways, it may be eligible for copyright protection! It's important to remember that only the parts of the work that are authored by humans can be copyrighted.
In a world where artificial intelligence is increasingly contributing to creative endeavours, a question arises regarding the copyrightability of AI-generated content. The debate surrounding this topic is complex and multifaceted. Hence, it requires a thorough examination to fully understand the issue. Let’s dive into this murky digital pool with a dash of wit.

Picture this: A robot tapping away at its keyboard, spewing out sonnets that would make Shakespeare blush. Now, who owns those sonnets? The robot? Its creator? Or perhaps the ghost of the Bard himself? Cue dramatic music.
Sure, AI can churn out content faster than a caffeinated squirrel on a treadmill, but does that mean it deserves the same copyright protections as human-made masterpieces? It’s like asking if a blender can claim royalties for the smoothie it blends.

Legal scholars are scratching their heads (and probably reaching for the Advil) trying to decipher this conundrum. After all, copyright law was crafted with human ingenuity in mind, not algorithms that binge-watch cat videos for inspiration.
On the flip side, denying AI copyright protection could stifle innovation faster than you can say “404 error.” Imagine a world where AI creators throw in the towel because they can’t monetize their digital brainchildren. It’s like telling a toddler they can’t keep their finger paintings.

So, can AI-generated content be copyrighted? The answer is about as clear as mud in a hurricane but there's some light at the end of this tunnel.
The U.S. Copyright Office has recently provided some guidance on this topic. AI-generated content can sometimes be copyrighted, according to David Siegel, partner at Grellas Shah LLP. Thus far, the Copyright Office, has explained that, for a work to be afforded copyright protection in the U.S., it must have a human author. Yet, Siegel said he is not sure what that means in the world of AI.
If the only human involvement is the input of a chat prompt into ChatGPT, for example, one cannot obtain copyright protection for the raw result of that prompt," Siegel said. On the other hand, if a user inputs a prompt into an AI tool, gets a response and then modifies the result in creative ways, that can potentially result in content afforded copyright protection. However, only human-authored parts of the work can be copyrighted.
One thing’s for sure: as long as there are humans behind the AI, there’ll be a legal circus worthy of the big top. Grab your popcorn and enjoy the show!
The Copyright Conundrum: Can AI-Generated Content be copyrighted
In a world where artificial intelligence is making strides in creative endeavours, one burning question arises: Can AI-generated content be copyrighted? It’s a debate that’s as perplexing as trying to teach a goldfish to fetch.
Introduction
In the modern era of data management and analysis, seamless integration between platforms is paramount. SharePoint, a widely used collaboration tool, often houses valuable data that organizations need to leverage for decision-making. Power Pages, on the other hand, offers robust capabilities for data visualization and analysis. By syncing data from SharePoint lists to Power Pages tables, organizations can streamline workflows and enhance data-driven insights. Below are step-by-step instructions on how to achieve this synchronization effortlessly.
This is my SharePoint library which I’m going to sync it to Power Pages

- Go to Power Pages and select "Table" in the Data section.

- Opt for "New table from external data".

- If a Sharepoint connection exists, choose it; otherwise, create a new connection and proceed.

- Input the SharePoint List URL for data retrieval, then click "Next".


- Select the desired list from the available options on the site.

- Provide a display name and proceed by clicking "Next".

- Complete the setup by clicking "Finish".

- Once done, the selected list will be visible in the Data section.

- All items from the list will populate in Power Pages table.
- Additionally, you can add new items or update existing ones, and these changes will be automatically synced.


Conclusion
Efficient data management is crucial for organizations aiming to stay competitive in today's dynamic business landscape. By syncing SharePoint list data to Power Pages tables, organizations can harness the power of their data seamlessly. This synchronization process enables users to access, analyze, and update SharePoint data within the familiar interface of Power Pages, thereby enhancing productivity and facilitating informed decision-making. With these steps, organizations can unlock the full potential of their data assets, driving innovation and growth.

Step-by-Step Guide: Syncing SharePoint List to Power Pages Table
In the modern era of data management and analysis, seamless integration between platforms is paramount. SharePoint, a widely used collaboration tool,
Prerequisites
- Access to Power Automate
- Published Dataset
- Power BI Desktop
Power BI and Power Automate have emerged as powerful tools to harness the potential of data. In this blog post, we'll explore a practical scenario where you can seamlessly send notifications based on Power BI data using Power Automate. Specifically, we'll walk through the process of sending notifications to users who haven't logged their work hours, demonstrating the efficiency and ease of integrating these Microsoft Power Platform tools.
Example: Work Hours Tracking Notification
This example demonstrates how to send an email notification to users who haven't logged their worked hours:
Steps 1: Power BI Desktop
To start the process, open the report in Power BI Desktop and follow these steps:
- Create a new tab: Add a "Power Automate" tab or any descriptive name.
- Add Visual: Add a table Visual from the visualization pane
- Apply filters: Select "Visualizations"> "Filters" and create a filter where "Logged Hours" equals 0.

- Performance Analysis: Navigate to the Optimize tab and select Performance Analyzer. Start recording, then click Refresh Visual to capture and analyze the query.


- Copy Query: Once the performance analysis is complete, copy the generated query. This will be crucial for the subsequent steps in Power Automate.
Step 2: Power Automate Integration
Now, let's seamlessly integrate Power BI data with Power Automate to automate notifications:
- Create a flow: Click "Create" > "Scheduled Cloud Flow".
- Set the frequency: Choose the desired interval for checking (e.g., daily, hourly).
- Add a trigger: Search for "Power BI" > "Run a query against a dataset."
- Select the workspace and then choose the dataset from the dropdown menu.

- Input Query Text: Paste the previously copied query from Power BI Desktop into the Query Text field. This ensures that Power Automate retrieves the specific dataset based on your defined criteria.
- Parse the retrieved data.
- Condition Check (Optional): Set up any additional condition to check if needed.

- Send Notification: Add Send an email action to send a notification.
Schedule Your Expert Session
Are you on the lookout for top-tier Power BI consultancy or specialized Power Automate consulting services to enhance your business's data management and automation strategies? Look no further! Our team of seasoned experts is here to guide you through the complexities of data visualization and process automation, ensuring your business leverages the full spectrum of capabilities offered by Power BI and Power Automate.
Don't miss this opportunity to transform your data strategy and automation processes. Connect with us. Schedule your consultation today with our experts. Our dedicated support will help you navigate the evolving digital landscape, ensuring your business remains ahead of the curve. Let's work together to turn your data into your most powerful asset and optimize your workflows for maximum efficiency.

How to run a query against a dataset in power automate?
Power BI and Power Automate have emerged as powerful tools to harness the potential of data. In this blog post, we'll explore a practical scenario where you can seamlessly send notifications based on Power BI data using Power Automate.
In the rapidly evolving digital landscape, Artificial Intelligence (AI) stands as a transformative force, reshaping how businesses operate, innovate, and deliver value to customers. As organizations embark on their AI journey, crafting a clear and strategic roadmap is imperative for unlocking AI's full potential. This guide outlines essential steps for business leaders to develop a robust AI strategy, ensuring successful integration and sustainable growth.
1. Aligning AI with Business Strategy
The journey begins by aligning AI initiatives with overarching business goals. Key actions include:

- Defining Business Objectives: Identify critical areas such as enhancing customer experience, boosting productivity, driving revenue growth, and enriching employee experience.
- Measuring Success: Establish metrics to gauge the impact and value of your AI-driven objectives.
- Prioritizing AI Use Cases: Select AI applications that align closely with your strategic goals, ensuring a focused approach to adoption.
- Investment Planning: Develop a portfolio management plan to guide investment in AI technologies, maximizing returns and strategic impact.
2. Crafting a Technology Strategy for AI
Technology serves as the backbone of AI implementation. Crucial considerations include:

- Application Strategy: Decide whether to buy existing solutions, modernize current applications, or build new AI applications from scratch.
- Infrastructure Assessment: Ensure your infrastructure supports secure, scalable, and efficient AI application deployment.
- Cloud vs. On-Premises: Evaluate hosting options for your data and AI applications, considering scalability, performance, and reliability.
- Zero Trust Security: Strengthen your security posture to protect data and AI assets against emerging threats, leveraging AI for enhanced security measures.
3. Developing an AI Strategy and Experience
To fully leverage AI, understanding and integrating generative AI into your business processes is key:

- Exploring Generative AI: Learn about generative AI applications and their potential to drive business innovation.
- Systematic AI Integration: Establish a process for evaluating AI's applicability across various use cases.
- Building Intelligent Apps: Utilize your data to develop apps that enhance the relevance and intelligence of AI model outputs.
- Leveraging Microsoft 365 Copilot: Consider using or developing your own AI copilot to expedite learning and value realization.
4. Fostering an Organizational Culture for AI
Success with AI transcends technology, deeply rooted in the organization's culture and operations:

- AI Operating Model: Define how AI will function within your organization, ensuring alignment with business strategies.
- Leadership and Support: Secure executive backing, underpinned by adequate resources and a vision for AI-driven transformation.
- Change Management: Strengthen your organization's adaptability to change, fostering an environment conducive to AI integration.
- Learning and Development: Implement learning paths and skill-building initiatives to empower your workforce with AI competencies.
5. Implementing AI Governance
Responsible AI use and governance are paramount for ethical and effective AI deployment:

- Responsible AI Practices: Share resources and adopt models that align with your organization's values and ethical standards.
- Governance Models: Choose a governance model (hub-and-spoke, centralized, distributed) that fits your organizational structure and needs.
- Secure AI Principles: Ensure comprehensive data protection, from the platform to applications and end-users.
- Data Privacy and Security: Develop processes and controls for AI governance, addressing data privacy and security implications.
Conclusion
Embarking on an AI journey requires meticulous planning, strategic alignment, and a commitment to ethical principles and continuous learning. By following this guide, leaders can lay a solid foundation for AI success, driving innovation and achieving strategic objectives. As AI continues to evolve, staying agile and informed will be key to leveraging AI's transformative potential.

Building a Foundation for AI Success: A Leader’s Guide
In the rapidly evolving digital landscape, Artificial Intelligence (AI) stands as a transformative force, reshaping how businesses operate, innovate, and deliver value to customers.
What is data refresh in Power BI?
Power BI serves as a crucial bridge connecting raw data to analytical tools, emphasizing the importance of maintaining current datasets for accuracy. Without regular updates, data becomes outdated, leading to unreliable analytics and misguided decisions. Refreshing your data in Power BI ensures you're working with the most recent information, allowing for effective tracking of data shifts, trends, and patterns. This process not only aids in making informed decisions but also in fine-tuning strategies based on evolving data insights.
Furthermore, refreshing data in Power BI can uncover discrepancies or errors, such as issues with the data source or its linkage to Power BI, indicating potential updating failures. Addressing these discrepancies is essential for guaranteeing the precision and trustworthiness of your data analysis.
Prerequisites
- Access to Power BI service
- Access to Power Automate
- A published Power BI dataset
To ensure your Power BI reports always reflect the latest trends, automating dataset refresh is crucial. This blog explores two effective methods: Scheduled refresh and Power Automate.
Method 1: Scheduled Refresh - Simple and Straightforward
- Navigate to your Dataset: In the Power BI Service, locate the dataset you want to automate.
- Access Settings: Click on the ellipsis (...) next to the dataset name and select "Settings."

- Schedule the Refresh: Under "Semantic Model," find the "Scheduled refresh" section. Click "Enable" and choose your desired refresh schedule. Options include hourly, daily, weekly, or monthly intervals.

- Save and Relax: Click "Apply" to activate the schedule. Power BI will automatically fetch new data based on your chosen frequency.
Method 2: Power Automate - Advanced Automation
- Create a Flow in Power Automate: Click here Power Automate and sign in. Click "Create" and choose a flow template (e.g., "Instant Cloud Flow" or “Scheduled Cloud flow”).

- Connect to Power BI: Search for the "Power BI - Refresh a Dataset" action and add it to your flow.
- Select Dataset: Choose the dataset you want to refresh.

- Save and Test: Click "Save" and run a test to ensure the flow functions correctly.
For additional expert guidance or services, don't hesitate to reach out for our Power BI consulting services. Our team of skilled Power BI consultants is ready to assist you in leveraging the full potential of your data analytics and reporting needs.
How to Automatically Refresh Power BI Datasets
Power BI serves as a crucial bridge connecting raw data to analytical tools, emphasizing the importance of maintaining current datasets for accuracy.
Unleashing the Economic Impact of Microsoft 365 E3
In the rapidly evolving digital landscape, businesses continually seek solutions that offer both operational efficiency and cost-effectiveness. Microsoft 365 E3 emerges as a formidable player in this arena, promising not just enhanced productivity but also significant cost savings. A comprehensive analysis of the Total Economic Impact™ of Microsoft 365 E3 reveals its potential to transform the financial dynamics of organizations.
1. Cost-Effective Licensing and Infrastructure Management
One of the most striking benefits of Microsoft 365 E3 is the considerable reduction in licensing costs. Organizations can consolidate their solution sets under Microsoft 365 E3, eliminating redundant licenses for communication, collaboration, file sharing, endpoint management, and more. This strategic move results in an average of 60% decrease in per-user licensing spend, translating to substantial savings over time.
2. Streamlining End-User Device Management
The shift towards a Bring-Your-Own-Device (BYOD) model, supported by Microsoft 365 E3, leads to a notable reduction in corporate expenditures on hardware, device plans, and administrative efforts. This strategic approach not only enhances mobile productivity but also fosters a more flexible and cost-efficient work environment.
3. Simplified IT Management and Reduced Workload
The inclusion of Microsoft Intune in Microsoft 365 E3 simplifies the deployment and management of software, security updates, and operating systems. This unified endpoint management tool significantly reduces the resources and time required for IT administration, freeing up IT personnel to focus on higher-value tasks.
4. Boosting End-User Productivity
Microsoft 365 E3 integrates seamlessly with tools like Microsoft Teams, OneDrive, and SharePoint, improving communication and collaboration. This integration saves users an average of 60 hours per year, enhancing overall organizational productivity and reducing time spent on routine tasks.
5. Travel and Expense Savings
The capability of Microsoft Teams to facilitate remote meetings cuts down on travel and associated expenses. This shift to virtual collaboration not only fosters a sustainable work culture but also results in substantial cost savings in terms of airfare, meals, insurance, and more.
6. Enhanced Security and Reduced Risk
Microsoft 365 E3 enhances organizational security, reducing the risk of data breaches and other cybersecurity threats. Features like Multi-Factor Authentication (MFA), conditional access policies, and integrated security logs fortify the organization’s defense against emerging digital threats.
Conclusion
The shift to Microsoft 365 E3 represents a strategic decision that goes beyond mere technological upgrade. It embodies a cost-effective, secure, and productivity-enhancing solution, aligning perfectly with the needs of modern businesses. The economic impact of this transition is evident in the significant cost savings, enhanced security, and improved operational efficiency it brings. As organizations continue to navigate the complexities of the digital era, Microsoft 365 E3 stands as a beacon of efficiency and economic viability.
Note: The insights and data presented in this blog are based on a comprehensive study, The Total Economic Impact™ of Microsoft 365 E3, commissioned by Microsoft and conducted by Forrester Consulting. The study provides an in-depth analysis of the financial impacts and benefits of Microsoft 365 E3 adoption.

Smart Ways to Reduce Costs with Microsoft 365 E3
In the rapidly evolving digital landscape, businesses continually seek solutions that offer both operational efficiency and cost-effectiveness.
Creating a vacation approval flow and sending a notification back to there quester is a great way to streamline processes within an organization. Given your company's expertise in SharePoint, Power Platform, and AI, you can leverage Microsoft Power Automate to build this flow. Here's a step-by-step guide:
Step 1: Set Up SharePoint List
- Create a SharePoint List: Name it "Vacation Approval".
- Add Necessary Columns: Include columns for Employee Name, Start Date, End Date, Supervisor email (for approval), and Status (New, Approved, Rejected) etc.
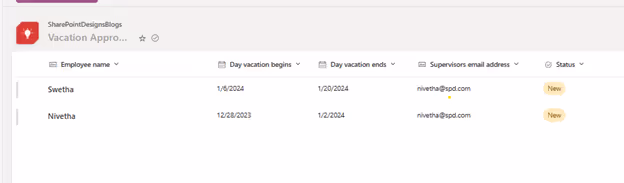
Step 2: Create the Power Automate Flow
- Access Power Automate: Log in to your Microsoft 365 account and open Power Automate.
- Create a New Automated Cloud Flow: Choose the template “When an item is created”

Step 3: Trigger Setup
- Set SharePoint Site and List: Select the SharePoint site and the "Vacation Approval" list as the trigger. This starts the flow when a new item is added to the list.
Step 4: Approval Process
- Add an Approval Action: Search for and add the “Start and wait for an approval” action.
- Configure Approval Details: Set the Title, Assigned To (Manager’s email), Details (like vacation period), and Link to Item.

Step 5: Condition to Check Approval Status
- Add a Condition: After the approval action, add a Condition to check the Outcome of the approval.
- Set Conditions: Use the dynamic content to set conditions like Outcome is equal to Approve and Outcome is equal to Reject.
Step 6: Update SharePoint List Based on Approval
- Add Actions for Approved and Rejected:
- If approved, add an action to update the SharePoint list item status to “Approved”.
- If rejected, update the item status to “Rejected”.
Step 7: Send Notification to Employee
- Add Email Action: For both Approved and Rejected branches, add “Send an email notification” action.
- Configure Email: Use dynamic content to include the Employee's email, a relevant subject, and a personalized message about the approval status.
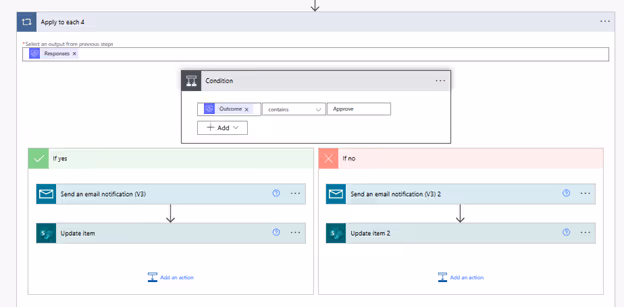
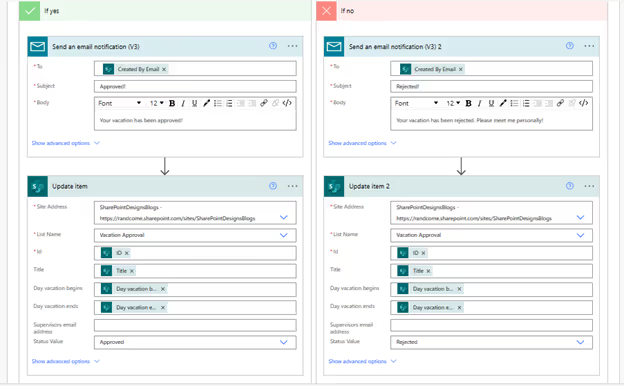
Step 8: Update SharePoint List Based on Approval
- Add Actions to Update the SharePoint List:
- In the Approved branch, after the email action, add an action to update the SharePoint list item status to “Approved”.
- In the Rejected branch, follow the email action with an update to change the status to “Rejected”.
Step 9: Save and Test
- Save Your Flow: Ensure all steps are correctly configured.
- Test the Flow: Create a test vacation request in SharePoint and observe the flow execution.
Flow results:
1. Vacation Request Email

2. Email Notification to the sender

3. List updated with Status.

Looking to revolutionize your approval processes? Connect with our expert sharepoint consultants for personalized guidance. Explore our Power Automate services to seamlessly integrate sophisticated approval workflows in SharePoint. Click here and schedule a call to elevate your business efficiency with our tailored solutions. Start your journey with us today!

How to Create a Vacation Approval Flow in SharePoint
Creating a vacation approval flow and sending a notification back to the requester is a great way to streamline processes within an organization.

Introduction
As organizations adapt to the dynamic landscape of HR technology, Microsoft Viva emerges as a pivotal player in the People Analytics Technology (PAT) arena. The insights from the "State of the Market 2023" report by RedThread Research underscore the relevance of Viva in addressing key PAT trends and challenges. Let's explore how Viva is positioned in this evolving market.
PAT Market Growth and Microsoft Viva
The PAT market has grown substantially, indicating a strong demand for data-driven HR solutions. Microsoft Viva, with its integrated employee experience platform, capitalizes on this trend, offering tools that enhance decision-making and productivity within HR processes.
Strategic Adaptation in PAT
The slowdown in acquisitions and investments in PAT suggests a more mature, focused market. Viva, with its comprehensive suite of tools, aligns with this strategic shift, offering a robust solution that caters to diverse business needs without the necessity for multiple disparate systems.
Employee Experience in Focus
The rise of Employee Experience (EX) technologies, especially in hybrid work environments, is a key trend. Microsoft Viva excels in this area, providing a seamless platform for enhancing employee engagement, well-being, and productivity, resonating with the market's shift towards EX-centric solutions.
Retention and Efficiency with Viva
In the current competitive labor market, retention and efficiency are paramount. Microsoft Viva addresses these challenges through features like Viva Insights, which offer actionable data to improve employee satisfaction and operational efficiency.
Conclusion
The alignment of Microsoft Viva with the key trends highlighted in the "People Analytics Technology: State of the Market 2023" report is clear. As organizations seek to navigate the complexities of modern HR technology, Viva stands out as a comprehensive, adaptable solution poised to meet the evolving demands of the PAT market.

Embracing the Future of People Analytics: How Microsoft Viva Aligns with 2023 Market Trends
As organizations adapt to the dynamic landscape of HR technology, Microsoft Viva emerges as a pivotal player in the People Analytics Technology (PAT) arena.
In every business, managing documents and collaborating on files is essential. Microsoft SharePoint offers robust features to support these needs, with the Document Library being a key component. By managing your SharePoint Document Library effectively, you can significantly enhance your document handling experience.
Understanding and Creating a Document Library in SharePoint
A SharePoint document library provides a secure and easily accessible place for you and your team to store, collaborate on, and access documents from any device. For example, you might use a document library on a SharePoint site to consolidate all files related to a specific project or client. Adding files to the library or moving data between folders is as simple as dragging and dropping.
Step-by-Step guide for document library creation
Creating a document library in SharePoint is a straightforward process that can greatly enhance your organization's document management capabilities. Here’s a step-by-step guide to get you started:
Step 1: Log in to Your SharePoint Site
- Access your SharePoint site by logging in with your credentials.
- Ensure you have the necessary permissions to create a document library.
Step 2: Navigate to Site Contents
- Once logged in, Select ‘Site Contents’ on the top right-hand side.
Step 3: Create a New Document Library
- In the Site Contents page, click on ‘+ New’ and then select ‘Document library’ from the options.
- This action will prompt you to create a new document library.


- Select ‘Blank document’ and proceed.
Step 4: Configure Your Document Library

- Enter a name for your document library. Choose a name that clearly represents the type of documents it will contain.
- Optionally, you can provide a description for the library to give more context to its users.
- Decide whether to display this library on the site navigation.

Step 5: Add Documents to Your Library
- Navigate back to your document library.
- You can upload documents by clicking on ‘Upload’ and selecting the files from your computer.
- Alternatively, you can drag and drop files directly into the library.

Step 6: Organize and Manage Documents
- Use the features of the document library to organize your files. Create folders or use metadata columns to categorize your documents.
- Set up views to display your documents in the most useful way for your team.
Step 7: Share and Collaborate
- Share your document library or individual documents with team members.
- Utilize SharePoint’s collaboration features like co-authoring and comments to collaborate on documents.
Step 8: Access and Use Your Document Library
- Access your document library anytime from the SharePoint site.
- Use the library to store, share, and manage your documents effectively.
Conclusion
In our guide on establishing a well-structured document library in SharePoint, we've gone beyond mere file storage. We provide a roadmap for equipping your team with a dynamic platform that enhances both collaboration and data management. Our comprehensive blog post, "How to Create a Document Library in SharePoint," offers insights into elevating your document management strategies, pushing your organization towards heightened efficiency, clarity, and achievement.
By following these steps, you can set up a well-organized, easy-to-use document library that enhances your team’s productivity and collaboration. Creating a document library in SharePoint can significantly improve how your team stores and accesses important documents. Remember to take advantage of SharePoint’s robust features to get the most out of your document library.
As the digital world evolves, embracing new methodologies becomes crucial. With SharePoint Designs, you're at the forefront of a robust SharePoint environment, driving productivity amidst the ever-evolving dynamics of contemporary business. Should you need additional technical support, please don't hesitate to contact us at sales@sharepointdesigns.com

How to Create a Document Library in SharePoint – A Step-by-Step Guide
In every business, managing documents and collaborating on files is essential. Microsoft SharePoint offers robust features to support these needs,


.svg)
