Published Date -

January 5, 2024
How to Create a Vacation Approval Flow in SharePoint

Creating a vacation approval flow and sending a notification back to there quester is a great way to streamline processes within an organization. Given your company's expertise in SharePoint, Power Platform, and AI, you can leverage Microsoft Power Automate to build this flow. Here's a step-by-step guide:
Step 1: Set Up SharePoint List
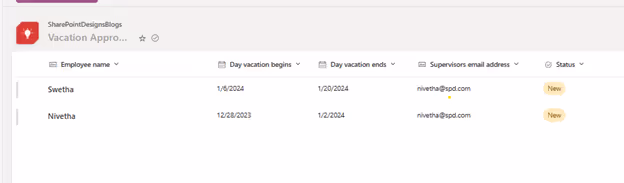
- Create a SharePoint List: Name it "Vacation Approval".
- Add Necessary Columns: Include columns for Employee Name, Start Date, End Date, Supervisor email (for approval), and Status (New, Approved, Rejected) etc.
Step 2: Create the Power Automate Flow
- Access Power Automate: Log in to your Microsoft 365 account and open Power Automate.
- Create a New Automated Cloud Flow: Choose the template “When an item is created”

Step 3: Trigger Setup
- Set SharePoint Site and List: Select the SharePoint site and the "Vacation Approval" list as the trigger. This starts the flow when a new item is added to the list.
Step 4: Approval Process
- Add an Approval Action: Search for and add the “Start and wait for an approval” action.
- Configure Approval Details: Set the Title, Assigned To (Manager’s email), Details (like vacation period), and Link to Item.

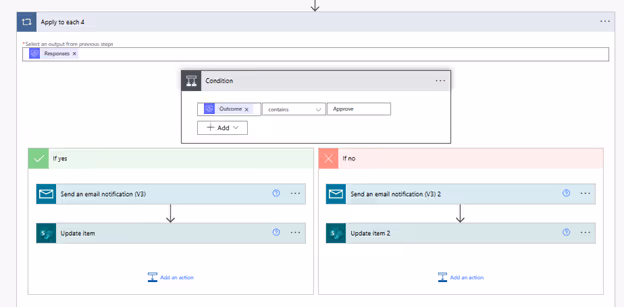
Step 5: Condition to Check Approval Status
- Add a Condition: After the approval action, add a Condition to check the Outcome of the approval.
- Set Conditions: Use the dynamic content to set conditions like Outcome is equal to Approve and Outcome is equal to Reject.
Step 6: Update SharePoint List Based on Approval
- Add Actions for Approved and Rejected:
- If approved, add an action to update the SharePoint list item status to “Approved”.
- If rejected, update the item status to “Rejected”.
Step 7: Send Notification to Employee
- Add Email Action: For both Approved and Rejected branches, add “Send an email notification” action.
- Configure Email: Use dynamic content to include the Employee's email, a relevant subject, and a personalized message about the approval status.
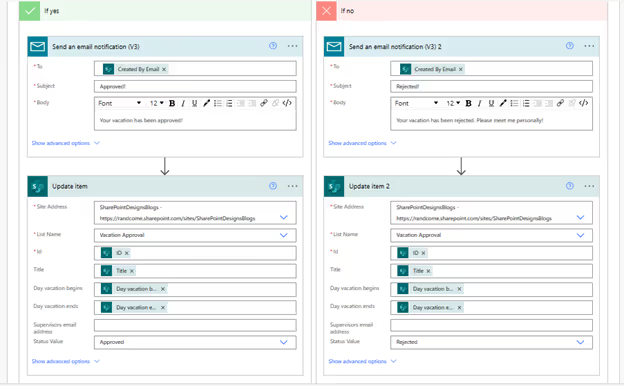
Step 8: Update SharePoint List Based on Approval
- Add Actions to Update the SharePoint List:
- In the Approved branch, after the email action, add an action to update the SharePoint list item status to “Approved”.
- In the Rejected branch, follow the email action with an update to change the status to “Rejected”.
Step 9: Save and Test
- Save Your Flow: Ensure all steps are correctly configured.
- Test the Flow: Create a test vacation request in SharePoint and observe the flow execution.
Flow results:
1. Vacation Request Email

2. Email Notification to the sender

3. List updated with Status.

Looking to revolutionize your approval processes? Connect with our expert sharepoint consultants for personalized guidance. Explore our Power Automate services to seamlessly integrate sophisticated approval workflows in SharePoint. Click here and schedule a call to elevate your business efficiency with our tailored solutions. Start your journey with us today!
No items found.
faqs
No items found.


.svg)