Published Date -

How to Deploy SharePoint Page Templates Across Multiple Sites: A Complete Step by Step Guide
Deploying a SharePoint page template to one site is easy. Deploying it to 85 sites is a different story entirely. The traditional route (PowerShell, PnP cmdlets, and one manual connection per site) is slow, error prone, and needs a developer on hand every single time. Template Deployer replaces that whole process with an experience that runs in the browser, natively inside SharePoint.
This guide covers everything: what Template Deployer is, the problem it solves, what you need before you start, and a full step by step walkthrough of deploying templates, tracking history, handling filename conflicts, and removing templates, clearly and without jargon.
Quick Summary : Template Deployer is a free SharePoint Framework (SPFx) web part. Add it to a page, pick your templates on the left and your target sites on the right, and click Deploy. It pushes templates to any number of sites at once, shows live progress, warns you before overwriting existing files, and logs every deployment automatically. No PowerShell, no scripts, no app registration, and you can remove a template from one site or many with a single click.
What is Template Deployer?
Template Deployer is a SharePoint Framework web part that runs natively inside SharePoint and turns the entire painful process of deploying to many sites into a few simple steps inside a browser. No PowerShell. No script. No terminal. No developer is required. You just opened a SharePoint page, and you are already there.
Because it is an SPFx solution, it picks up the authentication of whoever is signed automatically. There is no OAuth setup, no app registration to configure, and nothing to install on the client side. The moment the page loads, the tool is ready to be used.
The Problem It Solves
You spend hours building the perfect SharePoint page template: clean layout, the right web parts, properly branded, exactly how leadership wanted it. Everyone signs off. And then someone walks up to your desk and says:
“Can you push this to all 85 sites?”
And you sit there, knowing exactly what that means: PowerShell. Connect-PnPOnline. Get-PnPSiteTemplate. Invoke-PnPSiteTemplate. Site by site. For 85 sites. Manually. One at a time. Here is what that looks like every single time:
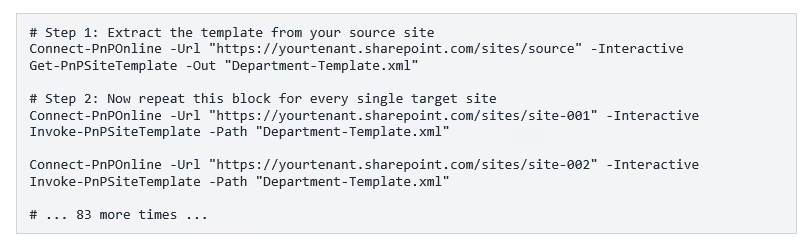
What makes this painful: You get no progress visibility at all. Filename conflicts either crash the script or silently overwrite your existing file. There is no audit trail, no rollback option, and you need PowerShell access plus a developer available every single time someone wants a template pushed.
That is not a workflow. That is a punishment. Every SharePoint admin has been there at least once, so we decided to fix it.
The Old Way vs. The Template Deployer Way
Before and after, side by side:
Before You Start: What You Need
- The Template Deployer web part added to a SharePoint page in your tenant (a single page is all you need, and it works from there for every site).
- Permissions to deploy across your target sites, typically a SharePoint administrator or an account with access to the sites you intend to deploy to.
- One or more-page templates saved in the source site's Site Pages / Templates folder, which is where Template Deployer reads your available templates from.
- A modern SharePoint site (Team site or Communication site). Modern pages and templates are not available on classic sites.
- A standard Microsoft 365 plan. No additional licence, PnP module, or PowerShell environment is required.
How to Deploy Templates with Template Deployer: Step by Step
Step 1: Open Template Deployer
When you first open Template Deployer, the Deploy Templates tab greets you. The web part has already done a lot of work before you click on anything. It has loaded your template source site, identified the Site Pages / Templates folder, and counted how many templates are available.
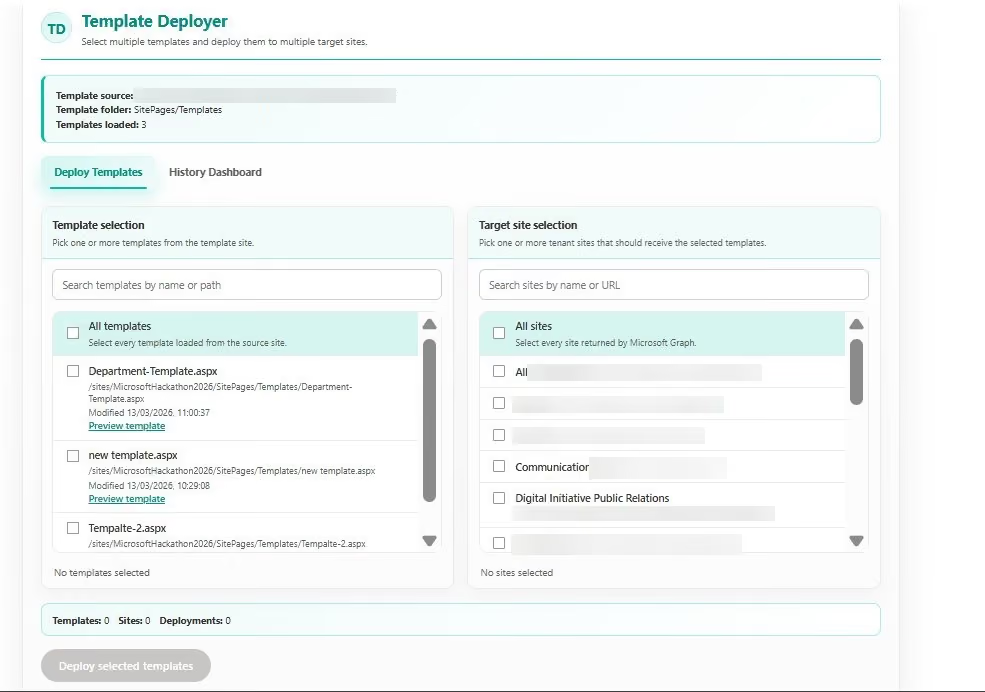
Left panel, Template Selection. Every template in the Site Pages / Templates folder shows up as a card with its filename, full path, and the time it was last modified. You can search by name or path, and each card has a “Preview template” link, so you can see exactly what the page looks like before you commit to deploying it anywhere.
Right panel, Target Site Selection. This pulls from Microsoft Graph in real time, so every SharePoint site in your tenant is listed. Search by site name or URL or tick the “All sites” checkbox at the top to select the entire tenant in one move.
Footer counter. A bar at the bottom keeps a running count of your selection: Templates, Sites, and Deployments. It starts at zero and updates the moment you begin selecting. The Deployments number is the one to watch, because it tells you the exact total number of operations about to run.
Step 2: Pick your templates and target sites
Here is what it looks like once you have made your selections. In this case, we have ticked Department-Template.aspx on the left and chosen testapp1 as the target site on the right. The footer has updated straight away to show Templates: 1, Sites: 1, Deployments: 1.
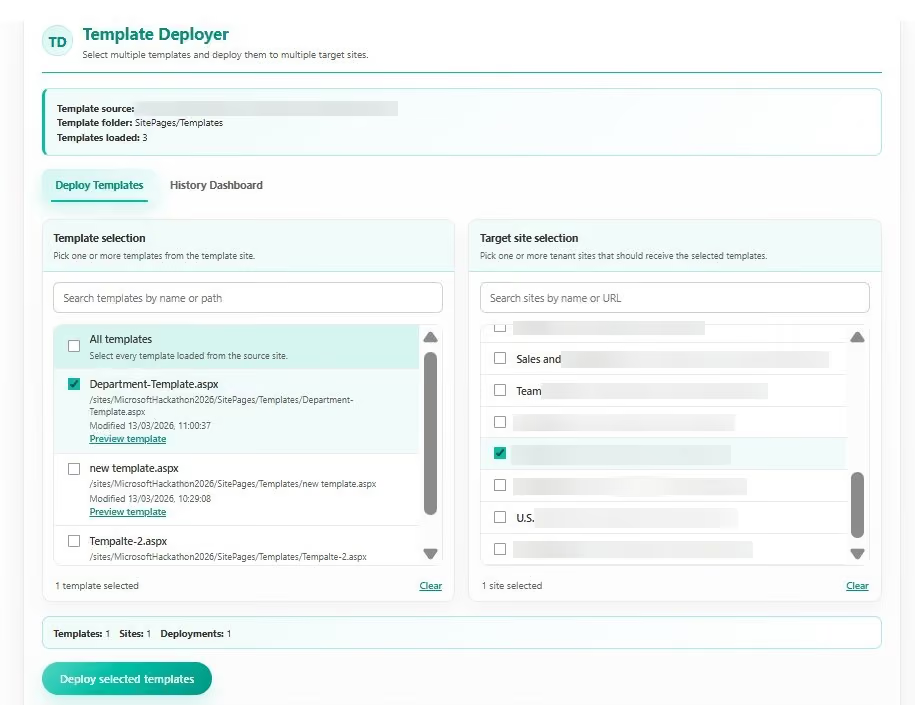
That footer number is really useful at scale. If you were deploying two templates across 85 sites, it would show 170 deployments before you clicked a single thing, with no guessing and no mental arithmetic. You can see the full scope of what you are about to do and confirm it is right before you pull the trigger.
Pro tip: Always glance at the Deployments count before deploying. It is the fastest sanity check that your template and site totals match what you actually intend.
When you are happy with your selection, the Deploy selected templates button at the bottom comes to life. Click on it and the deployment begins.
Step 3: Deploy and watch it happen live
The moment you click Deploy; the screen shifts into a live progress view where you can actually watch the work happening. Each site moves through its states in real time, going from pending to deploying to done right in front of you.
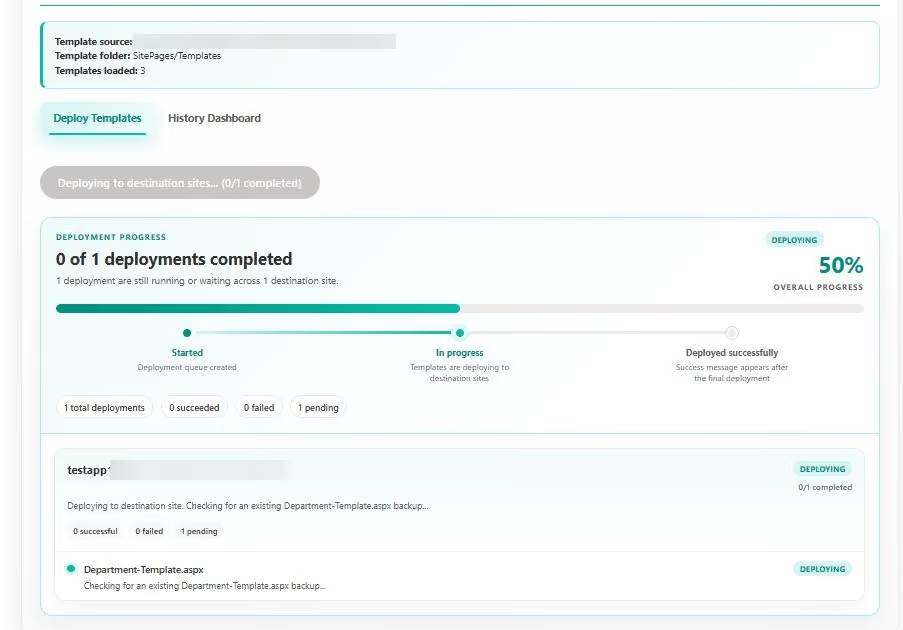
The progress screen lays out a pipeline with three stages, so you always know where things are:
- Started means the deployment queue has been created, and things are moving.
- In progress, means templates are actively being copied to the destination sites right now.
- Deployed successfully means every destination site has finished cleanly.
Under the hood: There is a 400 ms gap between each operation, plus automatic retry logic with exponential backoff for 429 throttle responses. This matters when you are hitting 85 sites. Template Deployer paces itself thoughtfully and recovers automatically if it hits a rate limit, rather than firing requests as fast as it can and hoping the API keeps up.
Each destination site also has its own status card showing how many of its assigned templates are complete. So, if you are deploying to ten sites and nine are done but one is still running, you can see exactly which one it is and how far along it is.
Step 4: Resolve any filename conflicts
This feature might save you the most grief. When a file with the same name already exists on one of the target sites, most approaches handle it badly. Scripts crash, or worse, silently overwrite your existing file. You only find out when users start asking why their page looks different.
Template Deployer catches the conflict before the copy even starts. As soon as it detects a filename that already exists on a destination site, it pauses the deployment and shows you a dialog so you can decide what to do.
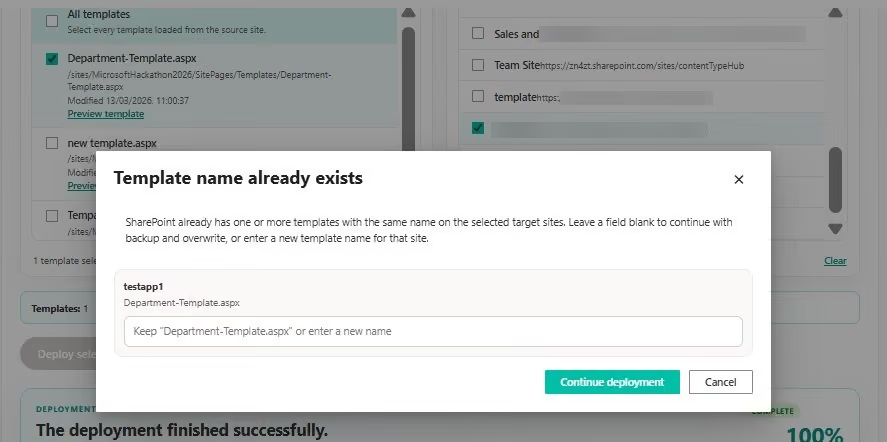
How does the rename work?
Leave the input field blank, and Template Deployer backs up the existing file before overwriting it with your new version. Or type a new filename, and your incoming template is deployed under that name instead, leaving the original completely untouched. Either way, nothing gets overwritten without you actively choosing it.
Once you have made your choice for each conflict, click Continue deployment and everything picks up right where it left off. It is a small dialog, but it represents a genuinely meaningful difference in how carefully this tool treats your content compared to a script that just barrels through.
Step 5: Confirm the finished result
When every site has finished, the progress screen settles into its final state and shows COMPLETE at the top right. The summary line confirms the totals: how many succeeded, how many failed, and how many are still pending. In a clean run, you want to see everything in the succeeded column.
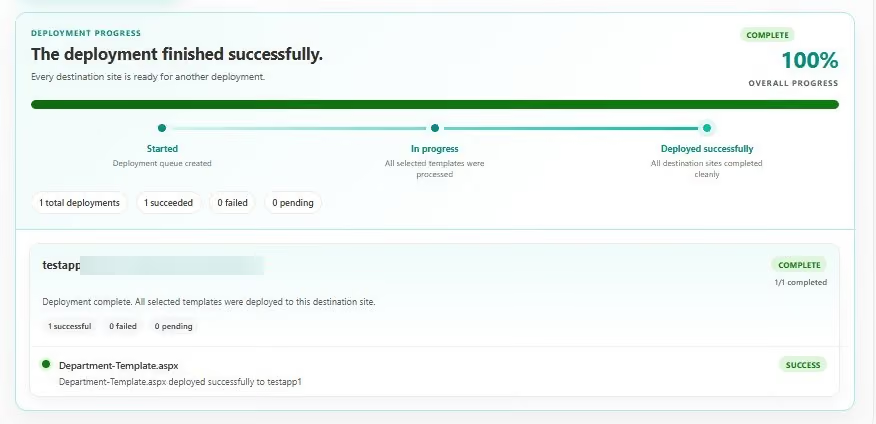
You do not have to take the tool word for it either. Click any site in the deployment results, and you can view the template live on that site in context, exactly as your users will see it when they open their page picker, the final confirmation you actually need. And if anything does go wrong, the result log shows the exact error message for every site that did not complete. Nothing is hidden.
Step 6: Review your full deployment history
Switch to the History Dashboard tab and you have a complete, searchable record of everything ever deployed through Template Deployer: every operation, every result, and every person who ran it.
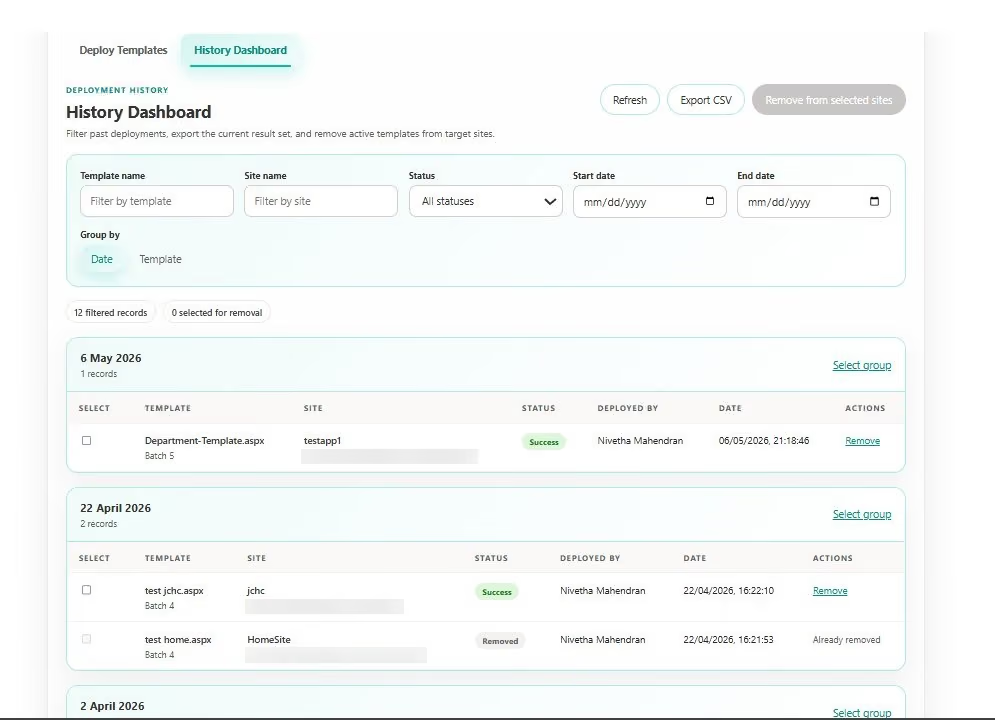
Every deployment is logged here automatically, so you always have a record to refer to. From this view you can filter by template name, site name, status, and date range. Group results by date for a chronological picture, or by template to see everything that happened to a specific template across all its deployments. When you need to share a report or hand out something off for an audit, the Export CSV button downloads the current filtered result set.
Step 7: Filter and group your history
Say you want the full story for Department-Template.aspx specifically. Type “department” into the Template Name filter and the list immediately trims to only the matching records. In this case it found seven records spread across different batches and dates.
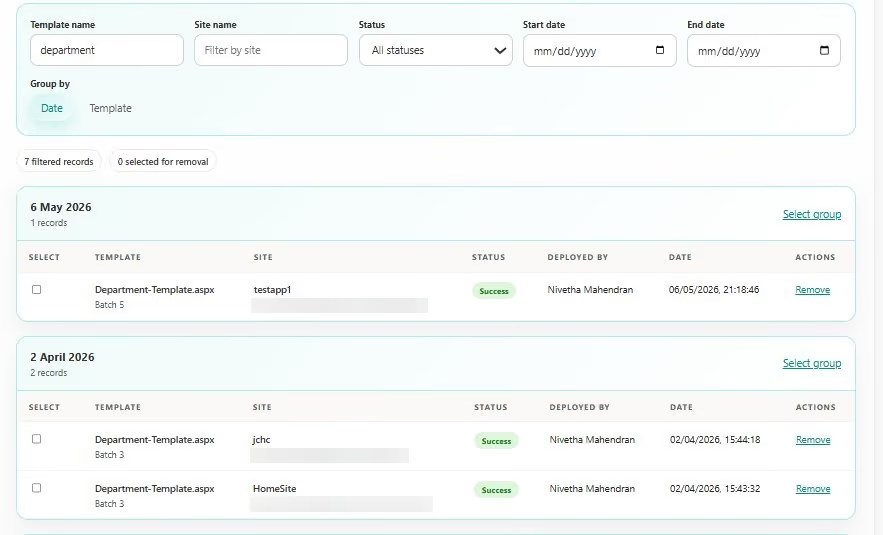
Now flip the Group by control from Date to Template, and the whole view reorganizes. Instead of date order, you see every site that Department-Template.aspx has ever been deployed to, all grouped together in one place.
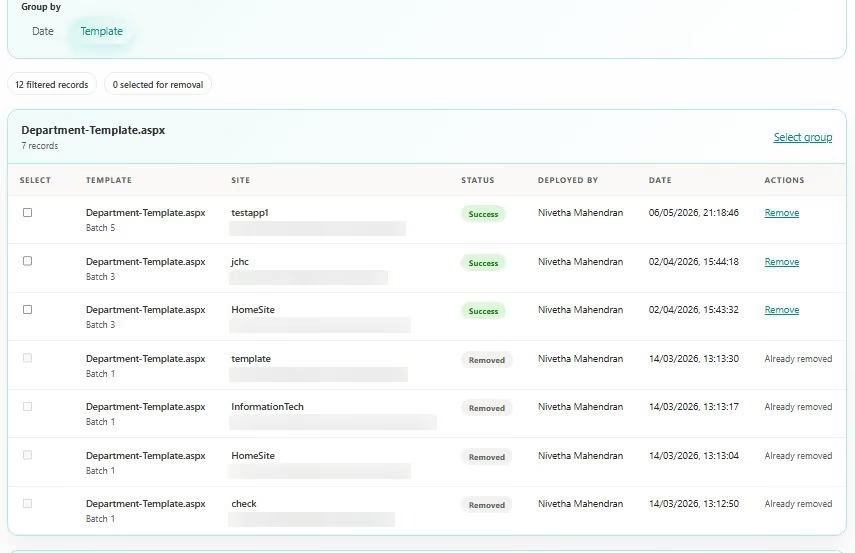
This grouped view is helpful when you need to understand the reach of a specific template. At a glance you can see which sites currently it have active, which sites have had it removed, who deployed each batch, and when, giving you the full picture without piecing it together from separate date groups.
Step 8: Remove a template from a site
When you need to take a template back off a site, you do not need a script or manual digging through SharePoint. Find the record in the History Dashboard and click the Remove link next to it. Before anything happens, Template Deployer shows a confirmation dialog.
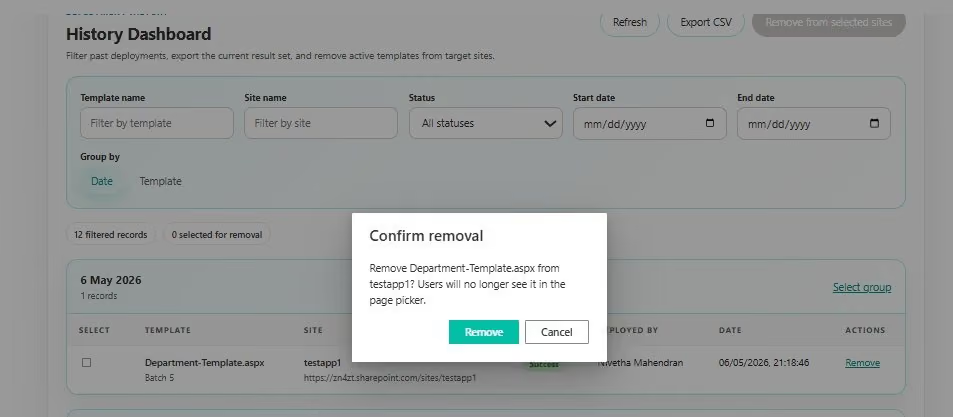
The dialog tells you exactly what will happen and gives you a chance to back out if you clicked Remove by mistake. Once you confirm, Template Deployer sends a REST API call to SharePoint and deletes the template page from the target site. While that happens, the button changes to read “Removing…” so you always know the request is still in flight and not to close anything.
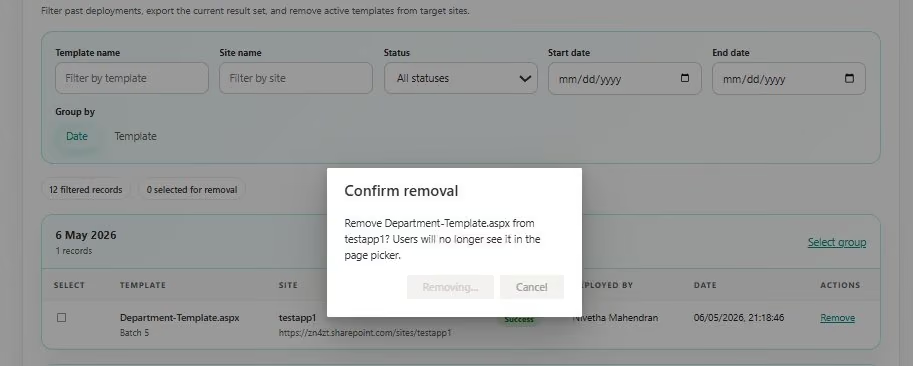

Once removal finishes, the history record updates on its own. The status column flips to Removed, and the Actions column shows “Already removed” going forward. This is not just a visual change; it is a permanent log entry recording that the template was intentionally removed from that site, not simply never deployed there.
Step 9: Remove templates from multiple sites at once
If you need to remove a template from several sites at the same time, you do not have to do them one by one. Tick the checkboxes next to the records you want to clear in the History Dashboard, and the “Remove from selected sites” button at the top of the page activates.
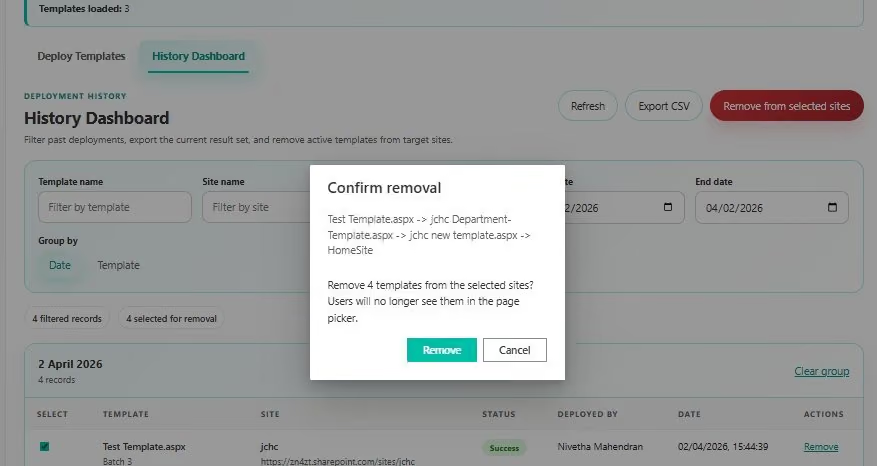
Clicking that button brings up a single confirmation dialog listing every template and every site involved in the bulk removal. You get to read through the full scope of what is about to happen before you confirm anything. Once you are satisfied, one click takes care of all of them together, and the log updates every record in the batch at the same time.
Template Deployer briefly
The capabilities you will reach for most often when rolling templates out across a tenant:
Template Deployer Best Practices
Before you deploy
- Preview first. Use the “Preview template” link on each card to confirm you are pushing the right page before you commit.
- Check the Deployments counter. Confirm the total operations match your intent, especially when combining multiple templates with many sites.
- Start narrow. For a new template, deploy one or two test sites first and verify the result before rolling out to the whole tenant.
During and after deployment
- Resolve conflicts deliberately. When the duplicate name dialog appears, choose to rename to preserve an existing page, or blank to back it up and overwrite. Do not click through on autopilot.
- Confirm live. Click through to a deployed site from the results view to see the template exactly as users will in their page picker.
- Read the error log. If any site fails, the result log names it and shows the exact error, so you can fix and run again only the affected sites.
Governance and audit
- Use history for accountability. Filter by template or site to answer, “where is this template live?” and “who deployed it?” in seconds.
- Export for audits. Use Export CSV on a filtered view when you need to hand out a record to compliance or leadership.
- Remove, don't orphan. When a template is retired, remove it through the dashboard, so the log captures the intentional removal rather than leaving stale pages behind.
Rolling templates out across a large tenant and want it done, right? SharePoint Designs can help you plan, brand, and deploy at scale.
Need Expert SharePoint Help?
SharePoint Designs is a Microsoft partner specialising in SharePoint Online intranet design, development, and deployment. Whether you need a fully branded intranet built from scratch, page templates designed to your brand, or tooling like Template Deployer rolled out across your organization, our team can help you get more out of Microsoft 365.
Book a Free Consultation here
faqs

Shantha Kumar


Shantha Kumar is a Chief Technology Officer (CTO), Microsoft MVP, and Solution Architect with extensive experience building secure, scalable solutions on Microsoft 365, SharePoint, SPFx, Power Platform, and Azure. He leads SaaS-focused engineering teams and actively shares practical insights as a global community speaker and author.






.svg)