How to Create a Page in SharePoint Online A Complete Step-by-Step Guide for 2026
%201.png)
SharePoint Online pages are the building blocks of every modern Microsoft 365 intranet. Whether you need a department homepage, a project hub, a resource library, or an announcement post, pages are how information gets organised and shared across your organisation. This guide covers everything from creating your first blank page to adding web parts, configuring layouts, and publishing in one place, clearly and without jargon.
What Is a SharePoint Online Page?
A SharePoint Online page is a modern, web-based content canvas that lives inside a SharePoint site. It is built by placing web parts modular content blocks onto a layout, then publishing the result to make it visible to people with access to the site.
Pages are stored in the Site Pages library of each site. Every site starts with a home page by default, and you can create as many additional pages as your content requires , there is no practical limit.
Before You Start - What You Need
- Edit permissions on the SharePoint site (Site Member or Site Owner role)
- A modern SharePoint site (Team site or Communication site), Quick Chart web part and modern pages are not available on classic sites
- Access to SharePoint Online via Microsoft 365, no additional licence required beyond a standard M365 Business or Enterprise plan
- A clear purpose for the page knowing whether it is a resource hub, department page, or landing page will guide your template and web part choices
Note: If you do not see the New button on your site, your SharePoint administrator may have disabled page creation. Ask them to enable it in SharePoint Admin Center → Settings → Pages → Allow users to create new modern pages.
How to Create a Page in SharePoint Online - Step by Step
Step 1: Navigate to your SharePoint site
Open your browser and go to the SharePoint site where you want to create the page. You must be signed in to Microsoft 365 with an account that has Edit or Owner permissions on that site.
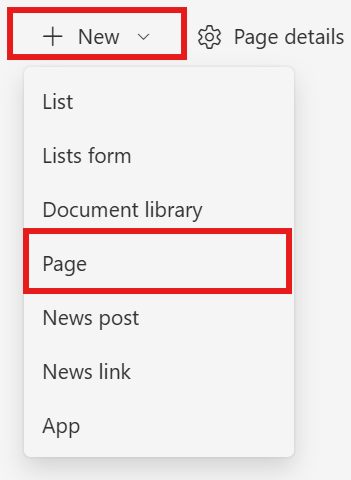
Step 2: Click New → Page
From the site home page or any existing page, click the New button in the top command bar. A dropdown menu will appear. Select Page from the options.
Alternative entry points: You can also go to Site Contents → Site Pages library → New, or use the SharePoint App Bar → Create → Page.
Step 3: Choose a template
The Template Gallery opens. You will see built-in templates including Blank, Visual, Basic Text, Showcase, and others. Select the template that best fits your content structure, then click Create page.
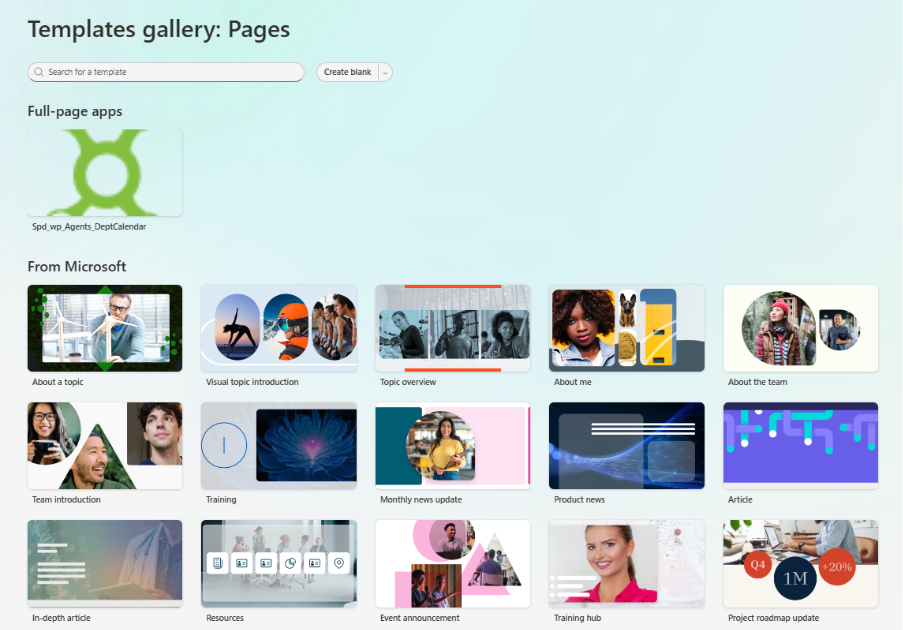
Template guidance:
- Blank - clean canvas, full control, best for experienced page builders
- Basic Text - pre-configured text and image layout, ideal for articles and documentation
- Visual - image-heavy layout, well suited to department landing pages and homepages
- Showcase - highlights featured content, good for project hubs and resource centres
Pro tip: If your organisation has saved custom page templates, they will appear in the Template Gallery under 'Saved on this site'. Using a template saves significant setup time and ensures brand consistency.
Step 4: Add a page title
Click inside the Add a title area at the top of the page and type your page title. This title appears in the browser tab, in search results, and in the Site Pages library.

- Keep titles clear and descriptive, they are indexed by Microsoft Search
- Avoid vague titles like 'New Page' or 'Untitled', they make the page hard to find later
- The title also becomes the default file name in the Site Pages library (spaces are replaced with hyphens)
Step 5: Add a banner image (optional but recommended)
Click the image icon in the title area to upload or select a banner image. You can choose from Stock images, OneDrive, your site's image library, or upload from your device.
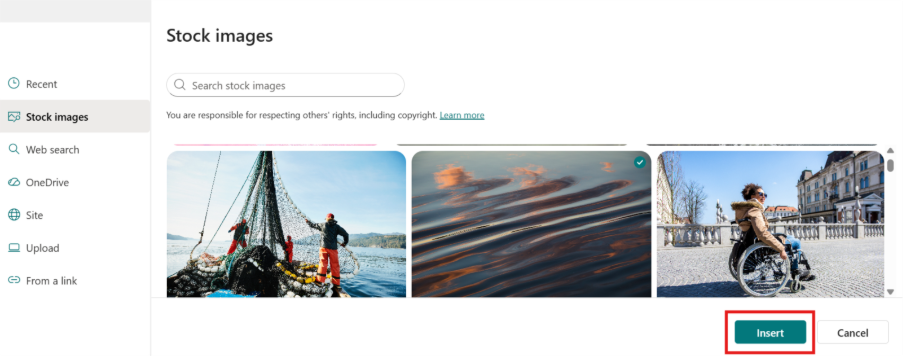
After selecting an image, use the focal point tool to control which part of the image is shown when the banner is cropped at different screen sizes. Set the focal point on the most important part of the image usually a face or a key visual element.
Step 6: Configure the title area layout
Click the Edit properties icon (pencil icon) in the title area to open the web part property pane. Under Layout, choose from six options:

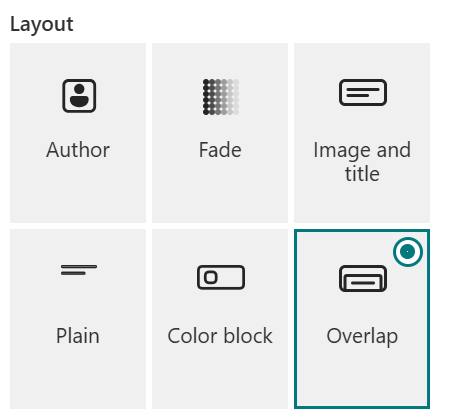
- Image and title - full-width banner with the title overlaid on the image (most visual)
- Plain - no image, clean white title area, works well for text-heavy pages
- Colour block - solid colour background behind the title, good for branded pages
- Overlap - page title overlaps the section below, creates depth
- Compact - minimal title height, maximises content area
- No title - removes the title area entirely for fully custom layouts
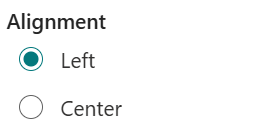
Under Alignment, choose Left or Centre to control where the title text is positioned within the title area.
Step 7: Once you have configured the page, click Publish at the top right corner to make the page live.

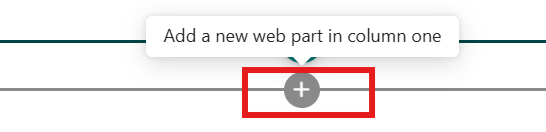
Step 8: Add web parts to your page
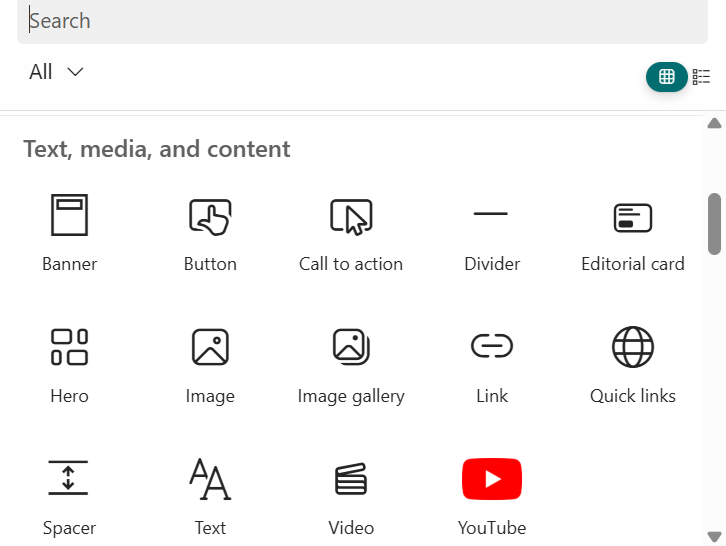
Click the + (plus) icon that appears when you hover between sections or at the bottom of the page. A web part picker opens. Search for the web part you need or browse by category.
Select the web part you wish to add (for example: Text, Image, Quick links, Document library, etc.).
After selecting a web part, it is placed on the page and its property pane opens on the right side. Configure the web part settings, then click anywhere outside the pane to close it. Repeat for each web part you need.
Moving web parts: click and hold the move icon (four-directional arrow) on a web part to drag it to a new position. Web parts can be moved within a section or between sections.
Deleting a web part: click the web part to select it, then click the Delete (bin) icon that appears in the toolbar.
Step 9: Organise content with sections and columns
SharePoint pages use sections as horizontal rows of content. Each section can contain one, two, three, or four columns. Click the + icon on the left side of the page (in edit mode) to add a new section.
- Single column - full-width content, best for text articles and announcements
- Two columns - side-by-side layout, good for pairing an image with text
- Three or four columns - grid layout, ideal for icon-based quick links or metric cards
- Full-width section - edge-to-edge layout, powerful for Hero and Banner web parts
Collapsible sections: you can set a section to be collapsible, letting users expand or collapse content blocks. This is useful for long pages with categorised content such as FAQs or policy libraries.
Step 10: Save and publish
When your page is ready, Click save & Publish
The Most Useful SharePoint Web Parts for Pages
SharePoint Online includes over 40 modern web parts. These are the ones you will reach for most often when building pages:
Finding web parts: in page edit mode, click the + icon and type the web part name in the search box. If a web part does not appear, it may not be enabled in your tenant. Contact your SharePoint administrator to check.
SharePoint Page Best Practices
Design and structure
- Start with a clear purpose every page should answer one question: what is this page for?
- Keep page titles short, descriptive, and searchable, Microsoft Search indexes them
- Use one full-width Hero or banner in the title area maximum stacking large visuals slows loading and reduces engagement
- Limit pages to 3–5 primary sections overly long pages have poor completion rates on mobile
- Set a focal point on all banner images this prevents important areas being cropped on mobile viewports
Content and governance
- Assign a page owner , every page should have a named person responsible for keeping it current
- Review pages every 6 months and archive or unpublish pages that are no longer relevant
- Save as draft before publishing any page for the first time share the draft link with a colleague for a review
- Use page templates for repeated page types such as department hubs, project pages, or policy pages
- Add the page to site navigation after publishing so users can find it without searching
Permissions and privacy
- Manage permissions at the site level rather than the page level permissions create maintenance complexity
- Use Private draft for sensitive pages being prepared for leadership review
- Anyone with Edit permission on the site can edit any page , if you need to restrict editing to specific people, create a separate site with tighter membership.
Need expert SharePoint help?
SharePoint Designs is a Microsoft Certified Gold partner specialising in SharePoint Online intranet design, development, and deployment. Whether you need a fully branded intranet built from scratch, page templates designed to your brand, or training for your content team, the SharePoint Designs team can help.
Get in touch